環境
vagrantのcentos7.x
参考情報
CentOS7にdockerをインストール - Qiita
CentOS7にPHP5.6をインストールする。 - Qiita
CentOS 7のDockerコンテナ内でsystemdを使ってサービスを起動する - Qiita
dockerのインストールしてcentos7のコンテナを準備
osを確認
[vagrant@localhost ~]$ cat /etc/redhat-release
CentOS Linux release 7.1.1503 (Core)
[vagrant@localhost ~]$
dockerをインストールして自動起動設定
[vagrant@localhost ~]$ sudo yum install -y docker
[vagrant@localhost ~]$ sudo systemctl start docker
[vagrant@localhost ~]$ sudo systemctl enable docker
ln -s '/usr/lib/systemd/system/docker.service' '/etc/systemd/system/multi-user.target.wants/docker.service'
[vagrant@localhost ~]$
dockerレジストリからダウンロード
[vagrant@localhost ~]$ sudo docker pull centos:7
[vagrant@localhost ~]$ sudo docker images
REPOSITORY          TAG                 IMAGE ID            CREATED             VIRTUAL SIZE
docker.io/centos    7                   ce20c473cd8a        3 weeks ago         172.3 MB
[vagrant@localhost ~]$
パッケージをインストール
httpd、php、mysql
[vagrant@localhost ~]$ sudo docker run -i -t centos:7 /bin/bash
[root@64d2c76f7c53 /]#
root@64d2c76f7c53 /]# cat /etc/redhat-release
CentOS Linux release 7.1.1503 (Core)
[root@64d2c76f7c53 /]# rpm -Uvh http://ftp.iij.ad.jp/pub/linux/fedora/epel/7/x86_64/e/epel-release-7-5.noarch.rpm
[root@64d2c76f7c53 /]# rpm -Uvh http://rpms.famillecollet.com/enterprise/remi-release-7.rpm
[root@64d2c76f7c53 /]# yum install -y httpd
[root@64d2c76f7c53 /]# yum install --enablerepo=remi --enablerepo=remi-php56 php php-opcache php-devel php-mbstring php-mcrypt php-mysqlnd php-phpunit-PHPUnit php-pecl-xdebug php-pecl-xhprof
[root@64d2c76f7c53 /]# yum install -y wget
[root@64d2c76f7c53 /]# wget http://dev.mysql.com/get/mysql-community-release-el7-5.noarch.rpm
[root@64d2c76f7c53 /]# rpm -Uvh mysql-community-release-el7-5.noarch.rpm
[root@64d2c76f7c53 /]# yum --enablerepo=mysql56-community install mysql-community-server
[root@64d2c76f7c53 /]# exit
※必要なリポジトリとパッケージをインストール
イメージを保存
[vagrant@localhost ~]$ sudo docker ps -a
CONTAINER ID        IMAGE               COMMAND             CREATED             STATUS                      PORTS               NAMES
64d2c76f7c53        centos:7            "/bin/bash"         11 minutes ago      Exited (0) 30 seconds ago                       furious_bose
[vagrant@localhost ~]$
[vagrant@localhost ~]$ sudo docker commit 64d2c76f7c53 centos:sample1
6e8a658c40905a27c28eff41ba63dd10a0cc2fcacfefb17b6606427d824ec123
[vagrant@localhost ~]$
[vagrant@localhost ~]$ sudo docker images
REPOSITORY          TAG                 IMAGE ID            CREATED             VIRTUAL SIZE
centos              sample1             6e8a658c4090        20 seconds ago      710.1 MB
docker.io/centos    7                   ce20c473cd8a        3 weeks ago         172.3 MB
[vagrant@localhost ~]$
新しいイメージをデーモン起動し、サービスを設定する
[vagrant@localhost ~]$ sudo docker run --privileged -d -p 8080:80 -p 13306:3306 centos:sample1 /sbin/init
eaa4464bc1ca5a560d15a56b6a78876900ebe62234826a7eb5972c5000c824df
[vagrant@localhost ~]$ sudo docker ps
CONTAINER ID        IMAGE               COMMAND             CREATED             STATUS              PORTS                                           NAMES
eaa4464bc1ca        centos:sample1      "/sbin/init"        9 seconds ago       Up 9 seconds        0.0.0.0:8080->80/tcp, 0.0.0.0:13306->3306/tcp   modest_kalam
[vagrant@localhost ~]$
[vagrant@localhost ~]$ sudo docker exec -it eaa4464bc1ca /bin/bash
[root@eaa4464bc1ca /]# which httpd
/usr/sbin/httpd
[root@eaa4464bc1ca /]# which php
/usr/bin/php
[root@eaa4464bc1ca /]# which mysqld
/usr/sbin/mysqld
[root@eaa4464bc1ca /]#
[root@eaa4464bc1ca /]# systemctl start httpd
[root@eaa4464bc1ca /]# systemctl start mysqld
[root@eaa4464bc1ca /]# systemctl enable httpd
ln -s '/usr/lib/systemd/system/httpd.service' '/etc/systemd/system/multi-user.target.wants/httpd.service'
[root@eaa4464bc1ca /]# systemctl enable mysqld
[root@eaa4464bc1ca /]#
※なんかsystemdの場合はサービスの制御がうまくいかないので起動方法は”/sbin/init”とする
mysql初期設定
[root@eaa4464bc1ca /]# /usr/bin/mysql_secure_installation


NOTE: RUNNING ALL PARTS OF THIS SCRIPT IS RECOMMENDED FOR ALL MySQL
      SERVERS IN PRODUCTION USE!  PLEASE READ EACH STEP CAREFULLY!

In order to log into MySQL to secure it, we'll need the current
password for the root user.  If you've just installed MySQL, and
you haven't set the root password yet, the password will be blank,
so you should just press enter here.

Enter current password for root (enter for none):
OK, successfully used password, moving on...

Setting the root password ensures that nobody can log into the MySQL
root user without the proper authorisation.

Set root password? [Y/n] n
 ... skipping.

By default, a MySQL installation has an anonymous user, allowing anyone
to log into MySQL without having to have a user account created for
them.  This is intended only for testing, and to make the installation
go a bit smoother.  You should remove them before moving into a
production environment.

Remove anonymous users? [Y/n] n
 ... skipping.

Normally, root should only be allowed to connect from 'localhost'.  This
ensures that someone cannot guess at the root password from the network.

Disallow root login remotely? [Y/n] y
 ... Success!

By default, MySQL comes with a database named 'test' that anyone can
access.  This is also intended only for testing, and should be removed
before moving into a production environment.

Remove test database and access to it? [Y/n] y
 - Dropping test database...
ERROR 1008 (HY000) at line 1: Can't drop database 'test'; database doesn't exist
 ... Failed!  Not critical, keep moving...
 - Removing privileges on test database...
 ... Success!

Reloading the privilege tables will ensure that all changes made so far
will take effect immediately.

Reload privilege tables now? [Y/n] y
 ... Success!


All done!  If you've completed all of the above steps, your MySQL
installation should now be secure.

Thanks for using MySQL!


Cleaning up...
[root@eaa4464bc1ca /]#
[root@eaa4464bc1ca /]# mysql -uroot
Welcome to the MySQL monitor.  Commands end with ; or \g.
Your MySQL connection id is 7
Server version: 5.6.27 MySQL Community Server (GPL)

Copyright (c) 2000, 2015, Oracle and/or its affiliates. All rights reserved.

Oracle is a registered trademark of Oracle Corporation and/or its
affiliates. Other names may be trademarks of their respective
owners.

Type 'help;' or '\h' for help. Type '\c' to clear the current input statement.

mysql> GRANT ALL PRIVILEGES ON *.* TO 'root'@'%' IDENTIFIED BY 'password' WITH GRANT OPTION;
Query OK, 0 rows affected (0.00 sec)

mysql> GRANT ALL PRIVILEGES ON *.* TO 'root'@'localhost' IDENTIFIED BY 'password' WITH GRANT OPTION;
Query OK, 0 rows affected (0.01 sec)

mysql> quit;
Bye
[root@eaa4464bc1ca /]#
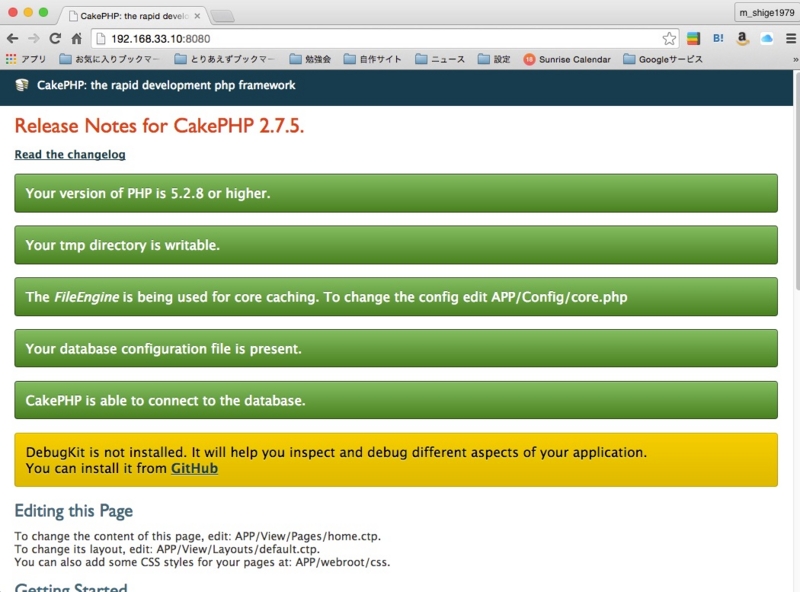
cakephpをダウンロードして適当に設定
[root@eaa4464bc1ca /]# wget https://github.com/cakephp/cakephp/archive/2.7.5.zip
[root@eaa4464bc1ca /]# yum install -y zip
[root@eaa4464bc1ca /]# yum install -y unzip
[root@eaa4464bc1ca /]# unzip 2.7.5.zip
[root@eaa4464bc1ca /]# mv cakephp-2.7.5 /var/www/html/cakephp
[root@eaa4464bc1ca /]# cd /var/www/html/cakephp/app/
[root@eaa4464bc1ca app]# chmod 777 -R tmp
[root@eaa4464bc1ca /]# exit
exit
[vagrant@localhost ~]$
一度止めて保存
[vagrant@localhost ~]$ sudo docker ps
CONTAINER ID        IMAGE               COMMAND             CREATED             STATUS              PORTS                                           NAMES
eaa4464bc1ca        centos:sample1      "/sbin/init"        30 minutes ago      Up 30 minutes       0.0.0.0:8080->80/tcp, 0.0.0.0:13306->3306/tcp   modest_kalam
[vagrant@localhost ~]$
[vagrant@localhost ~]$ sudo docker stop eaa4464bc1ca
eaa4464bc1ca
[vagrant@localhost ~]$
[vagrant@localhost ~]$ sudo docker images
REPOSITORY          TAG                 IMAGE ID            CREATED             VIRTUAL SIZE
centos              sample2             dd010520665e        11 seconds ago      933.7 MB
centos              sample1             6e8a658c4090        33 minutes ago      710.1 MB
docker.io/centos    7                   ce20c473cd8a        3 weeks ago         172.3 MB
[vagrant@localhost ~]$
確認
起動
[vagrant@localhost ~]$ sudo docker run --privileged -d -p 8080:80 -p 13306:3306 centos:sample2 /sbin/init
988de141af84020f8cc9d68821baccde7b815a49e776637a397cd3dc91b5df84
[vagrant@localhost ~]$
[vagrant@localhost ~]$ sudo docker ps
CONTAINER ID        IMAGE               COMMAND             CREATED             STATUS              PORTS                                           NAMES
988de141af84        centos:sample2      "/sbin/init"        8 seconds ago       Up 7 seconds        0.0.0.0:8080->80/tcp, 0.0.0.0:13306->3306/tcp   cranky_poitras
[vagrant@localhost ~]$
↓

所感
この状態まで持っていくのが結構たいへん。あとこれを複数用意できるか検証していく。
vagrantだから上手く行っただけでvpsとかでは失敗とかもあるかもしれないので…
vpsを2個、3個用意するのも面倒だし、dockerで配置して終わりって感じができたらうれしいかも…
![Dockerエキスパート養成読本[活用の基礎と実践ノウハウ満載!] (Software Design plus) Dockerエキスパート養成読本[活用の基礎と実践ノウハウ満載!] (Software Design plus)](http://ecx.images-amazon.com/images/I/51gFcibBx-L._SL160_.jpg)
Dockerエキスパート養成読本[活用の基礎と実践ノウハウ満載!] (Software Design plus)
- 作者: 杉山貴章,大瀧隆太,Yugui(Yuki Sonoda),中津川篤司,前佛雅人,松原豊,米林正明,松本勇気
- 出版社/メーカー: 技術評論社
- 発売日: 2015/06/18
- メディア: 大型本
- この商品を含むブログ (2件) を見る