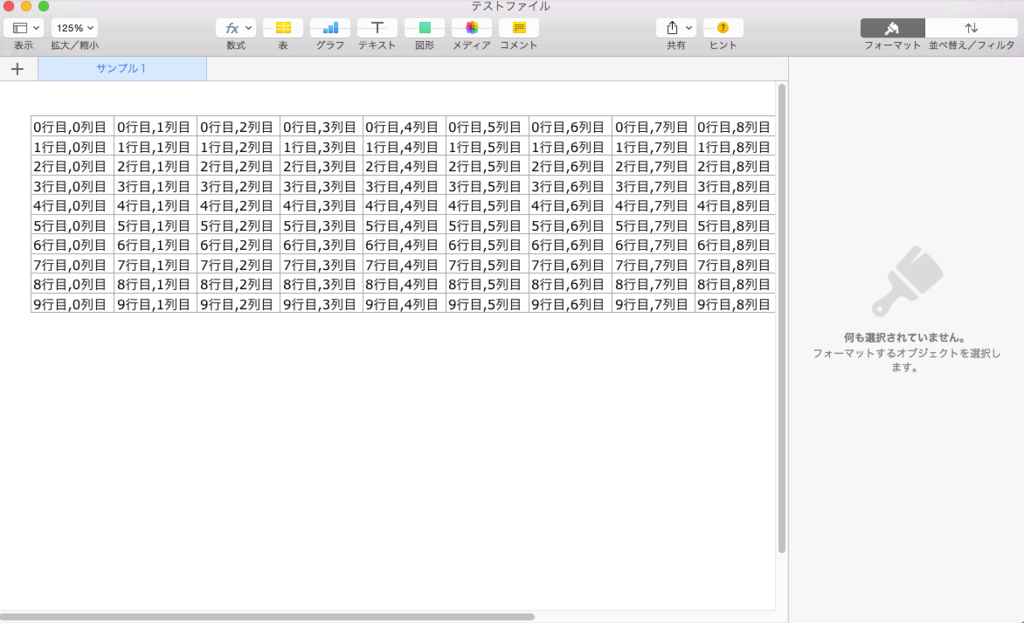
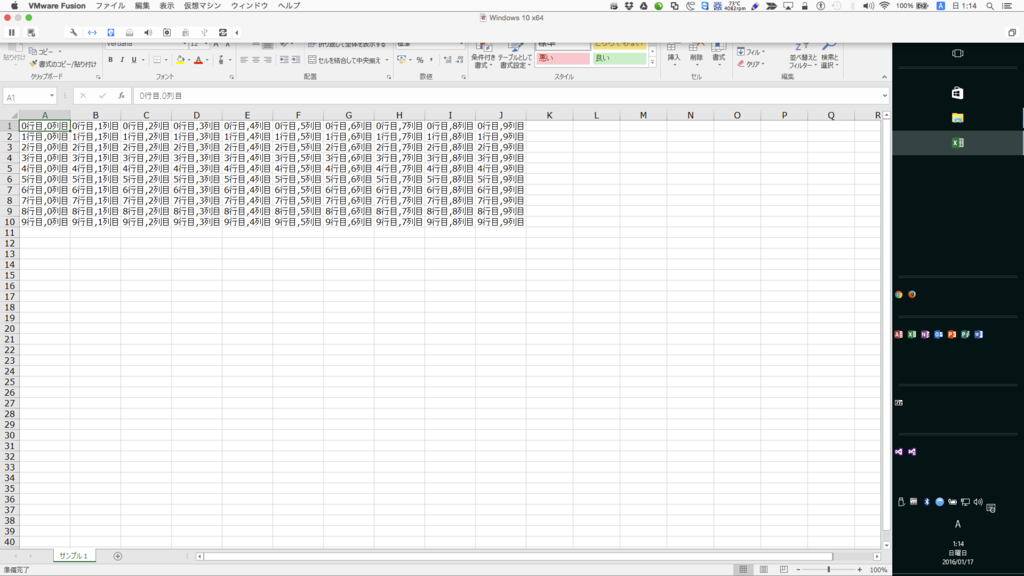
golangでExcelのファイルへ書き込み
使用するパッケージ
サンプルコード
package main

import (
    "fmt"
    "github.com/tealeg/xlsx"
)

func main(){
    // ファイル
    var file *xlsx.File
    // シート
    var sheet *xlsx.Sheet
    //
    var row *xlsx.Row
    var cell *xlsx.Cell
    var err error

    var fileName = "テストファイル.xlsx"

    file = xlsx.NewFile()
    sheet, err = file.AddSheet("サンプル1")
    if err != nil {
        fmt.Printf(err.Error())
    }

    for i:=0;i < 10;i++ {
        row = sheet.AddRow()
        for j:=0;j<10;j++ {
            cell = row.AddCell()
            cell.Value = fmt.Sprintf("%d行目,%d列目", i, j)
        }
    }

    // ファイルを保存
    err = file.Save(fileName)
    if err != nil {
        fmt.Printf(err.Error())
    }

}
goでライブラリのテストを試す
” testing”パッケージがある
これを使用してテストすることができるみたい
テスト対象
$ tree $GOPATH/src/github.com/mshige1979/
$GOPATH/src/github.com/mshige1979/
├── compute
│   └── add.go
└── hello
    └── hello.go

2 directories, 2 files
$
※computeとかいうサンプルライブラリ
テストコード
add_test.go
package compute

import (
    "testing"
)

func TestAdd(t *testing.T){
    const in1 = 10
    const in2 = 20
    const out = 30

    x := Add(in1, in2)
    if x != out {
        t.Error("Add(%d, %d) = %d\n Error!!!", in1, in2, x)
    }
}
※ファイル名に"_test"を付与するらしい
テスト
$ go test
PASS
ok  	github.com/mshige1979/compute	0.009s
$
テストちょっと詳しく
$ go test -v
=== RUN   TestAdd
--- PASS: TestAdd (0.00s)
PASS
ok  	github.com/mshige1979/compute	0.008s
$
こんな感じらしい
GOPATHを使用してgo installとかする
実行環境?
macです。ディスク容量がやばいのでもうそろそろ家のやつはminiに移行しようかと考え中
GOPATHってなん
go言語で使用する際のworkディレクトリみたいなものパッケージを取得する場合などやフレームワークを使いたい場合は必須
どこに作成するのか?
基本的に制限はないらしい
一般的にはgocodeとか別途バージョン番号とかで分けたりしていることもあるらしいけど
ディレクトリ構成は?
こうなった
$ tree
.
├── bin
├── pkg
└── src
    └── github.com
        └── mshige1979

5 directories, 0 files
$
bin:go installした際に配置される場所
pkg:中間ビルドされた時のファイルなどが配置されている感じ
src:ソースコードを置く
※go getコマンドで実行した際もここのディレクトリをベースに配置されるとのこと
サンプルになんかを作成する
hello的なやる
ディレクトリ作成
$ cd src/github.com/mshige1979/
$ mkdir hello
$ cd hello/
hello.go
package main

import (
    "fmt"
)

func main(){
    fmt.Printf("Hello, World!\n")
}
スクリプト実行
$ go run hello.go
Hello, World!
$
go install
$ go install
$ tree $GOPATH/bin
$GOPATH/bin
└── hello

0 directories, 1 file
$
※作成されていること
実行
$ $GOPATH/bin/hello
Hello, World!
$
ライブラリを作成する
computeとか…
ディレクトリ作成
$ mkdir compute
 cd compute/
add.go
package compute

func Add(a int, b int) int {
    return a + b
}
※まあ、超適当で…
さっきのhello.goを修正する
package main

import (
    "fmt"
    "github.com/mshige1979/compute"
)

func main(){
    fmt.Printf("Hello, World!\n")

    a := 10
    b := 20
    c := compute.Add(a, b)
    fmt.Printf("%d + %d = %d\n!", a, b, c)
}
インストールして実行
$ go install
$ $GOPATH/bin/hello
Hello, World!
10 + 20 = 30
$
pkgの中身
$ tree $GOPATH/pkg
$GOPATH/pkg
└── darwin_amd64
    └── github.com
        └── mshige1979
            └── compute.a

3 directories, 1 file
$
所感
goは使っていない変数とかパッケージの名前がおかしいと警告や想定案みたいなものをだすので原因をそこそこ見つけやすい
ちょっとテスト方法とかも調べてみる
SonarQubeをJenkinsで実行
Jenkinsインストール
sudo wget -O /etc/yum.repos.d/jenkins.repo http://pkg.jenkins-ci.org/redhat/jenkins.repo
sudo rpm --import http://pkg.jenkins-ci.org/redhat/jenkins-ci.org.key
sudo yum install jenkins -y
sudo chkconfig jenkins on
sudo service jenkins start
※プラグインとか初期設定は適当にする
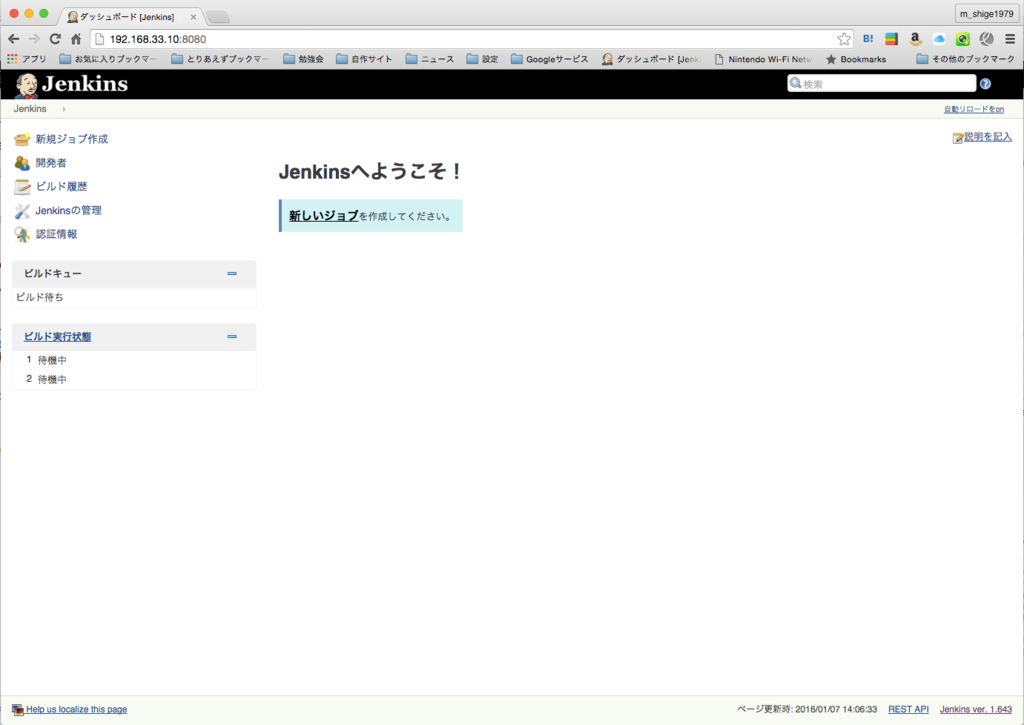
SonarQubeのJenkinsプラグインをインストールする
https://wiki.jenkins-ci.org/display/JENKINS/SonarQube+plugin
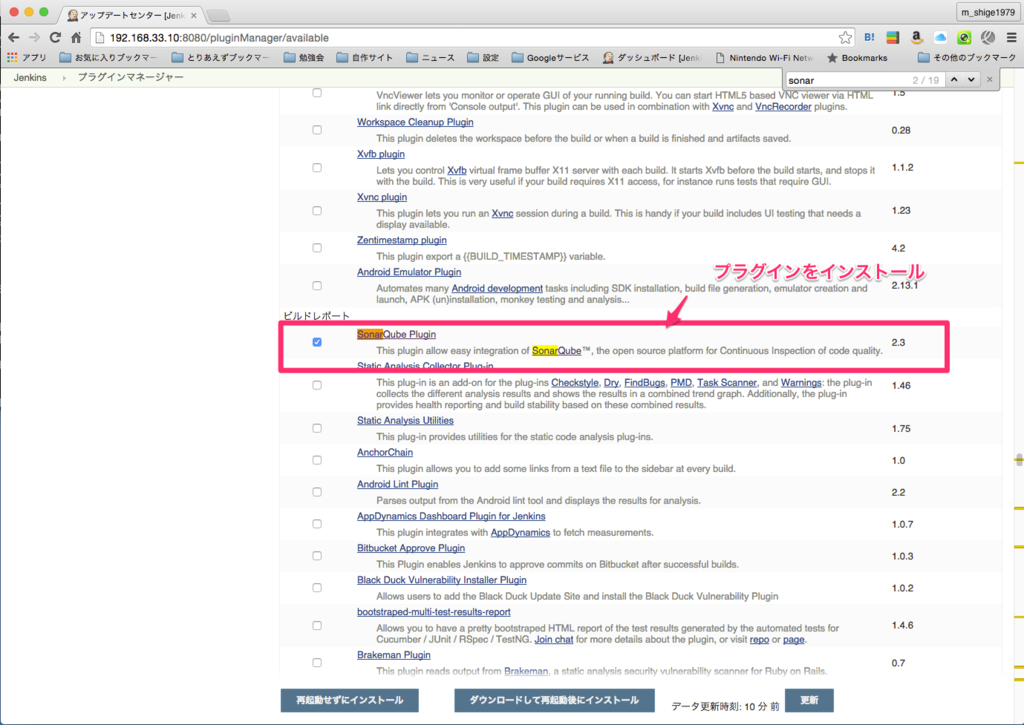
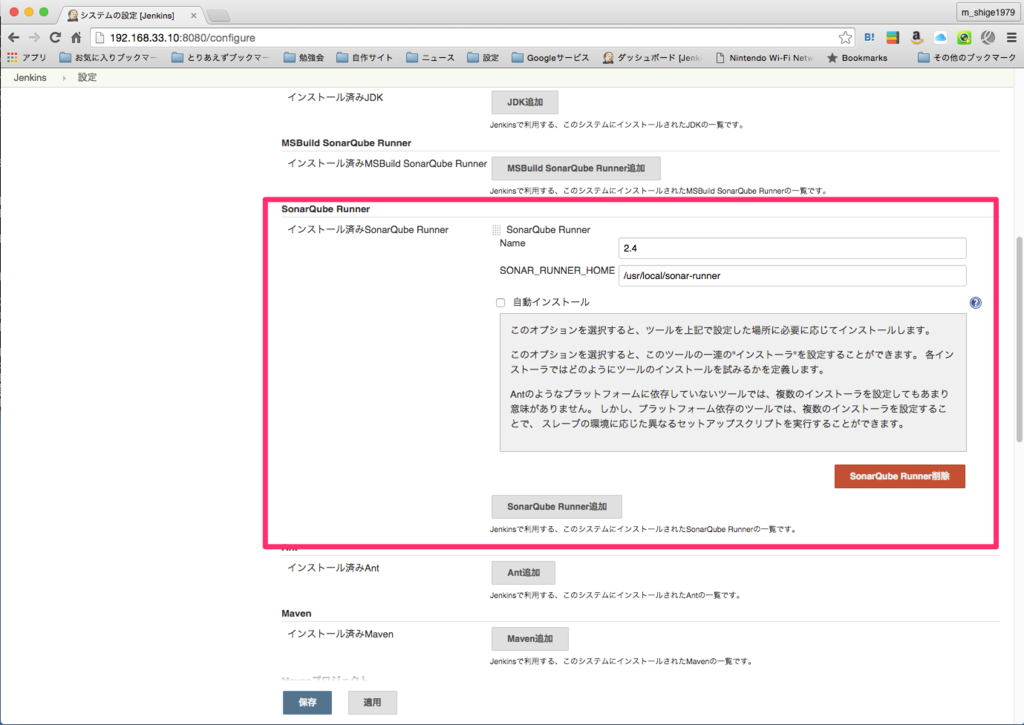
Jenkinsの「Jenkinsの管理」→「システム設定」を開き、SonarQubeの設定を確認する
Runner
Server

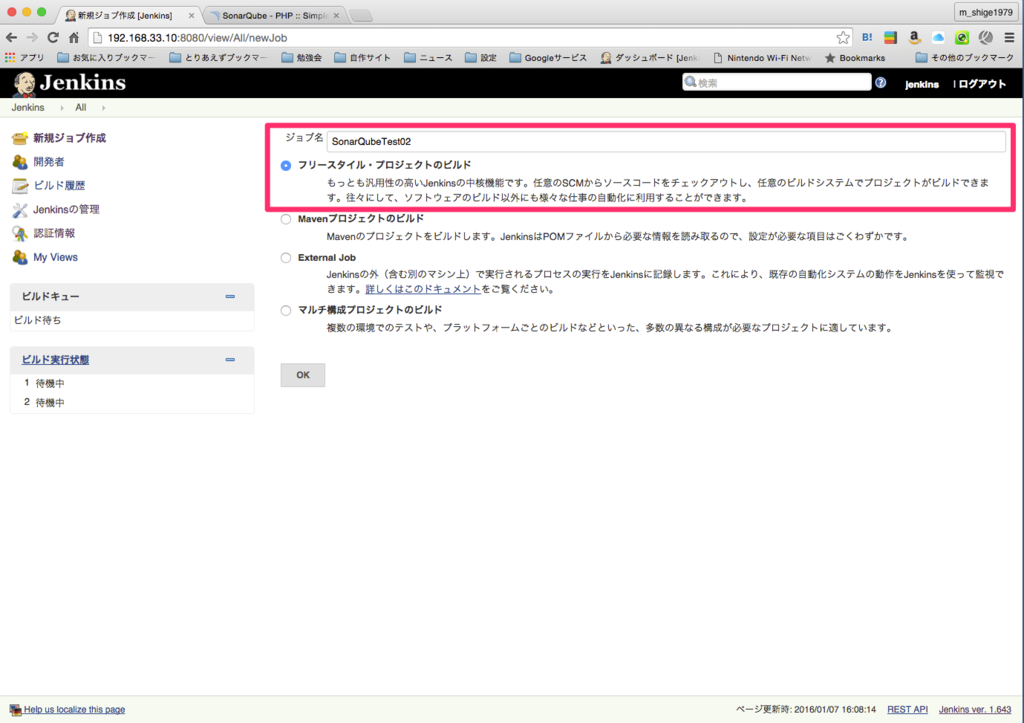
ジョブを設定
プロジェクトの作成
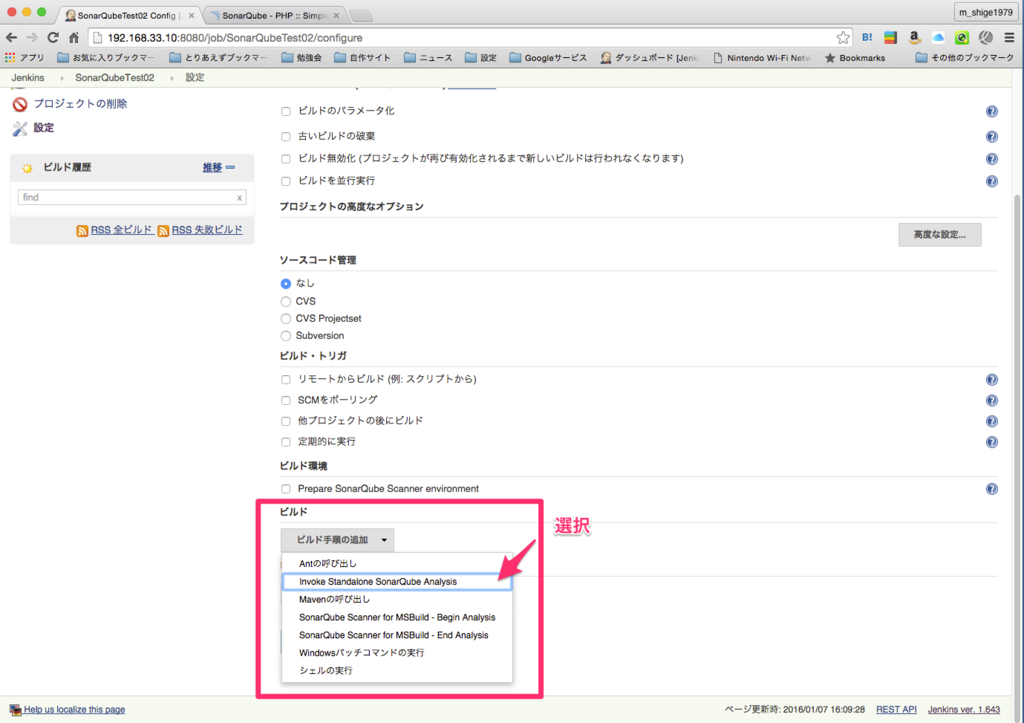
ビルドの「Invoke Standalone SonarQube Analysis」を選択
パラメータを指定

ビルド結果
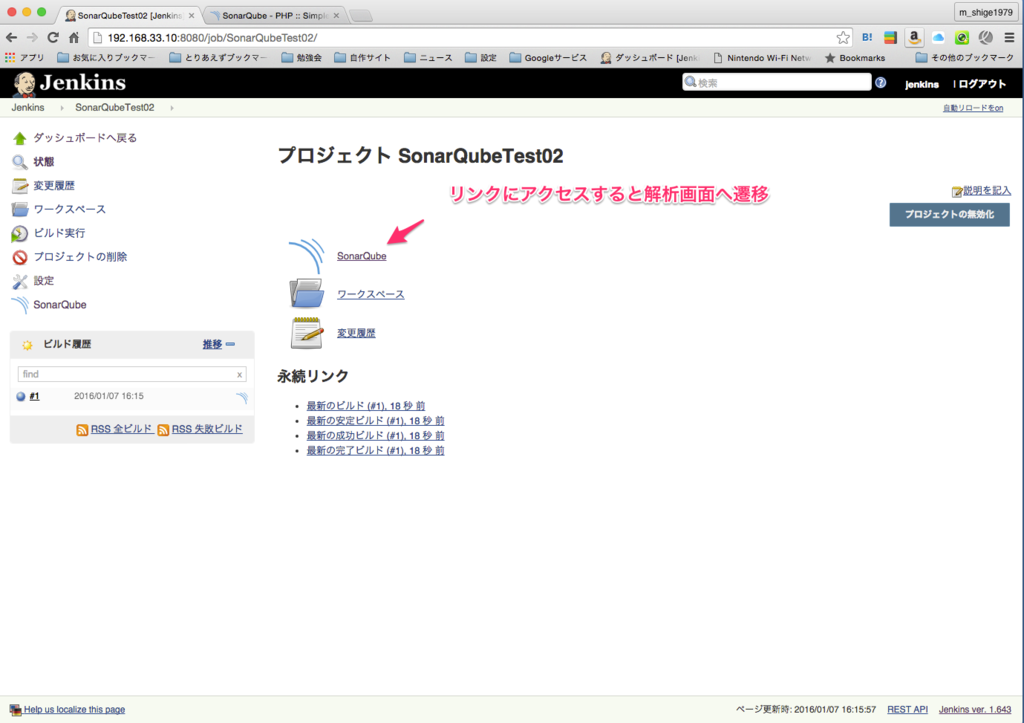
おわり
所感
コマンドで実行する場合とjenkinsで実行する方法はまあなんとかこれでいい感じ。
除外するデータなどはパラメータを調べてから除外していく。
ルール自体はまあそのうち見てみよう。覚えるのがキツイのでちょっと後回し
centos6.xにsonarqubeをインストール
品質管理してみる
ソースコードは書いても基本、コードに対する評価はあまりしてもらったことがない。
まあ、そんな感じの仕事ばかりなのでいろいろ気になってきた
ツール
http://www.sonarqube.org/
これを入れてみる
環境
OS
VagrantのCentOS6.x
Java
wget --no-check-certificate --no-cookies - --header "Cookie: oraclelicense=accept-securebackup-cookie" http://download.oracle.com/otn-pub/java/jdk/8u5-b13/jdk-8u5-linux-x64.rpm
sudo yum -y install jdk-8u5-linux-x64.rpm
MySQL
5.6
sudo yum -y install http://dev.mysql.com/get/mysql-community-release-el6-5.noarch.rpm
sudo yum -y install mysql-community-*
sudo service mysqld start
sudo chkconfig mysqld on
PHP
5.6
sudo rpm -Uvh http://ftp.iij.ad.jp/pub/linux/fedora/epel/6/x86_64/epel-release-6-8.noarch.rpm
sudo rpm -Uvh http://rpms.famillecollet.com/enterprise/remi-release-6.rpm
sudo yum install --enablerepo=remi --enablerepo=remi-php56 php php-opcache php-devel php-mbstring php-mcrypt php-mysqlnd php-phpunit-PHPUnit php-pecl-xdebug php-pecl-xhprof
Qonarqubeサーバインストール
ダウンロード、解凍
wget https://sonarsource.bintray.com/Distribution/sonarqube/sonarqube-5.2.zip
unzip sonarqube-5.2.zip
配置
sudo mv sonarqube-5.2 /usr/local/sonarqube
MySQLデータベース
mysql -uroot -e "create database sonar;"
mysql -uroot -e "CREATE USER 'sonar' IDENTIFIED BY 'sonar';"
mysql -uroot -e "GRANT ALL ON sonar.* TO 'sonar'@'%' IDENTIFIED BY 'sonar';"
mysql -uroot -e "GRANT ALL ON sonar.* TO 'sonar'@'localhost' IDENTIFIED BY 'sonar';"
環境設定ファイル修正
/usr/local/sonarqube/conf/sonar.properties
#--------------------------------------------------------------------------------------------------
# DATABASE
#
# IMPORTANT: the embedded H2 database is used by default. It is recommended for tests but not for
# production use. Supported databases are MySQL, Oracle, PostgreSQL and Microsoft SQLServer.

# User credentials.
# Permissions to create tables, indices and triggers must be granted to JDBC user.
# The schema must be created first.
sonar.jdbc.username=sonar
sonar.jdbc.password=sonar

#----- Embedded Database (default)
# H2 embedded database server listening port, defaults to 9092
#sonar.embeddedDatabase.port=9092


#----- MySQL 5.x
# Only InnoDB storage engine is supported (not myISAM).
# Only the bundled driver is supported. It can not be changed.
sonar.jdbc.url=jdbc:mysql://localhost:3306/sonar?useUnicode=true&characterEncoding=utf8&rewriteBatchedStatements=true&useConfigs=maxPerformance
BINLOG_FORMATを変更
[vagrant@localhost ~]$ mysql -uroot
Welcome to the MySQL monitor.  Commands end with ; or \g.
Your MySQL connection id is 8
Server version: 5.6.28 MySQL Community Server (GPL)

Copyright (c) 2000, 2015, Oracle and/or its affiliates. All rights reserved.

Oracle is a registered trademark of Oracle Corporation and/or its
affiliates. Other names may be trademarks of their respective
owners.

Type 'help;' or '\h' for help. Type '\c' to clear the current input statement.

mysql> SHOW GLOBAL VARIABLES LIKE 'binlog_format';
+---------------+-----------+
| Variable_name | Value     |
+---------------+-----------+
| binlog_format | STATEMENT |
+---------------+-----------+
1 row in set (0.00 sec)

mysql> SET GLOBAL binlog_format = 'MIXED';
Query OK, 0 rows affected (0.00 sec)

mysql>
mysql> SHOW GLOBAL VARIABLES LIKE 'binlog_format';
+---------------+-------+
| Variable_name | Value |
+---------------+-------+
| binlog_format | MIXED |
+---------------+-------+
1 row in set (0.00 sec)

mysql> quit
Bye
[vagrant@localhost ~]$
※標準の状態では起動後にエラーになるおそれがある
起動
sudo /usr/local/sonarqube/bin/linux-x86-64/sonar.sh start
↓
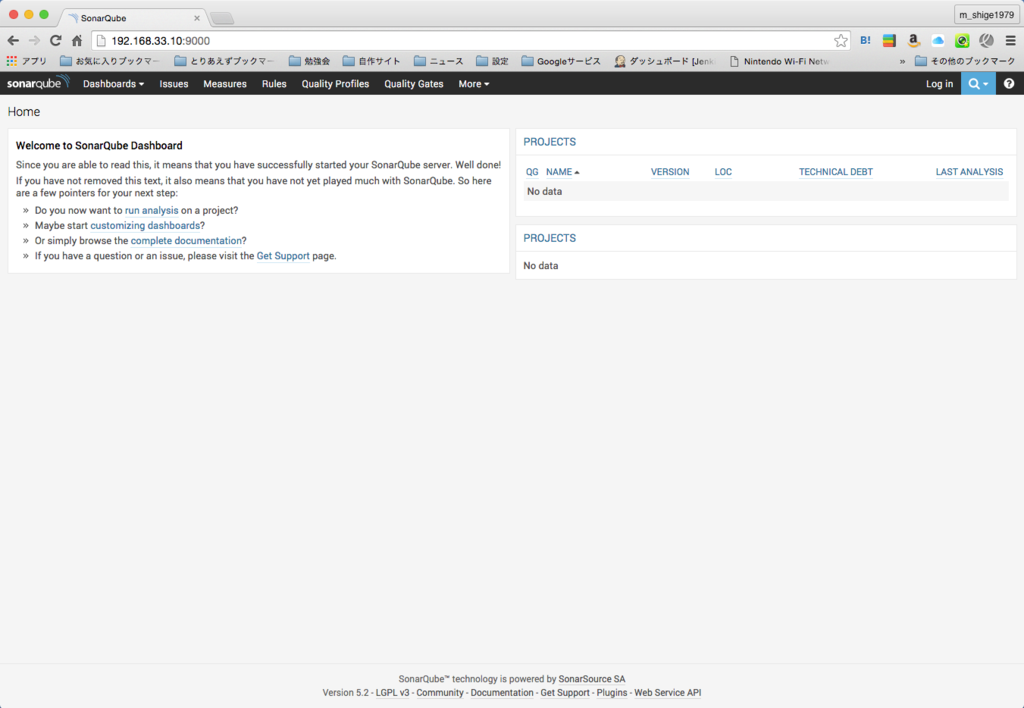
QonarqubeScannerをインストール
ダウンロード、解凍
wget http://repo1.maven.org/maven2/org/codehaus/sonar/runner/sonar-runner-dist/2.4/sonar-runner-dist-2.4.zip
unzip sonar-runner-dist-2.4.zip
配置
sudo mv sonar-runner-2.4 /usr/local/sonar-runner
sudo echo 'export PATH="/usr/local/sonar-runner/bin:$PATH"' >> ~/.bash_profile
source  ~/.bash_profile
環境設定ファイル修正
/usr/local/sonar-runner/conf/sonar-runner.properties
#Configure here general information about the environment, such as SonarQube DB details for example
#No information about specific project should appear here

#----- Default SonarQube server
sonar.host.url=http://192.168.33.10:9000

#----- PostgreSQL
#sonar.jdbc.url=jdbc:postgresql://localhost/sonar

#----- MySQL
sonar.jdbc.url=jdbc:mysql://localhost:3306/sonar?useUnicode=true&characterEncoding=utf8

#----- Oracle
#sonar.jdbc.url=jdbc:oracle:thin:@localhost/XE

#----- Microsoft SQLServer
#sonar.jdbc.url=jdbc:jtds:sqlserver://localhost/sonar;SelectMethod=Cursor

#----- Global database settings
sonar.jdbc.username=sonar
sonar.jdbc.password=sonar

#----- Default source code encoding
sonar.sourceEncoding=UTF-8

#----- Security (when 'sonar.forceAuthentication' is set to 'true')
sonar.login=admin
sonar.password=admin
自動起動
sudo ln -s /usr/local/sonarqube/bin/linux-x86-64/sonar.sh /etc/init.d/sonar
sudo chkconfig sonar on
サンプルの解析
サンプルをダウンロード
[vagrant@localhost ~]$ git clone https://github.com/SonarSource/sonar-examples.git
Initialized empty Git repository in /home/vagrant/sonar-examples/.git/
remote: Counting objects: 7469, done.
remote: Total 7469 (delta 0), reused 0 (delta 0), pack-reused 7469
Receiving objects: 100% (7469/7469), 7.52 MiB | 553 KiB/s, done.
Resolving deltas: 100% (3202/3202), done.
[vagrant@localhost ~]$
phpのやつへ移動
cd sonar-examples/projects/languages/php/php-sonar-runner
[vagrant@localhost php-sonar-runner]$ ll
合計 16
-rw-rw-r-- 1 vagrant vagrant  451  1月  6 15:19 2016 README.md
-rw-rw-r-- 1 vagrant vagrant  331  1月  6 15:19 2016 sonar-project.properties
drwxrwxr-x 2 vagrant vagrant 4096  1月  6 15:19 2016 src
-rw-rw-r-- 1 vagrant vagrant  272  1月  6 15:19 2016 validation.txt
[vagrant@localhost php-sonar-runner]$
プロジェクトファイル
/home/vagrant/sonar-examples/projects/languages/php/php-sonar-runner/sonar-project.properties
# Required metadata
sonar.projectKey=org.sonarqube:php-simple-sq-scanner
sonar.projectName=PHP :: Simple Project :: SonarQube Scanner
sonar.projectVersion=1.0

# Comma-separated paths to directories with sources (required)
sonar.sources=src

# Language
sonar.language=php

# Encoding of the source files
sonar.sourceEncoding=UTF-8
起動
sonar-runner
15:34:08.067 INFO  - Analysis reports sent to server in 527ms
15:34:08.068 INFO  - ANALYSIS SUCCESSFUL, you can browse http://192.168.33.10:9000/dashboard/index/org.sonarqube:php-simple-sq-scanner
15:34:08.068 INFO  - Note that you will be able to access the updated dashboard once the server has processed the submitted analysis report.
15:34:08.068 INFO  - More about the report processing at http://192.168.33.10:9000/api/ce/task?id=AVIXkuEll9B3bJ3AZgEx
INFO: ------------------------------------------------------------------------
INFO: EXECUTION SUCCESS
INFO: ------------------------------------------------------------------------
Total time: 9.238s
Final Memory: 8M/102M
INFO: ------------------------------------------------------------------------
↓
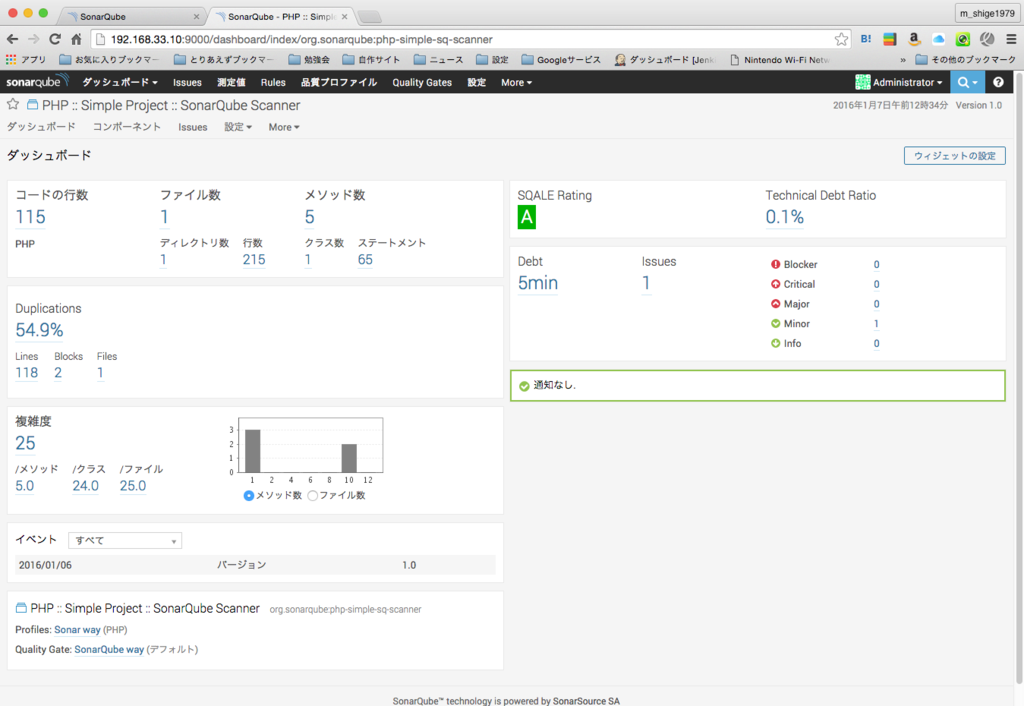
できた
とりあえず、ここまで
所感
マシンのパワーが多少いるけど、結果を視覚的に判定できるので結構よさげ…
英語で書かれているので問題の部分のコードを理解するのに時間がかかるかもしれないけど〜
Angular2のGetStartを試す
TypeScript?
基本的にはTypeScriptで書くような感じがいいらしい
JSの書き方だと可読性などやりにくい感じからかも…
実装
プロジェクト作成
IDEでもなんでもルートのディレクトリを作成する
package.jsonを準備
nodejsでパッケージを準備するのでpackage.jsonを作成
{
  "name": "angular2-quickstart",
  "version": "1.0.0",
  "scripts": {
    "tsc": "tsc",
    "tsc:w": "tsc -w",
    "lite": "lite-server",
    "start": "concurrent \"npm run tsc:w\" \"npm run lite\" "
  },
  "license": "ISC",
  "dependencies": {
    "angular2": "2.0.0-beta.0",
    "systemjs": "0.19.6",
    "es6-promise": "^3.0.2",
    "es6-shim": "^0.33.3",
    "reflect-metadata": "0.1.2",
    "rxjs": "5.0.0-beta.0",
    "zone.js": "0.5.10"
  },
  "devDependencies": {
    "concurrently": "^1.0.0",
    "lite-server": "^1.3.1",
    "typescript": "^1.7.3"
  }
}
tsconfig.jsonを作成
tsconfig.json
{
  "compilerOptions": {
    "target": "ES5",
    "module": "system",
    "moduleResolution": "node",
    "sourceMap": true,
    "emitDecoratorMetadata": true,
    "experimentalDecorators": true,
    "removeComments": false,
    "noImplicitAny": false
  },
  "exclude": [
    "node_modules"
  ]
}
npmでインストール
npm install
※必要なパッケージを取り込む
※1回でインストールが成功しない場合がある場合は何回か試してみる
appディレクトリを作成
app/app.component.ts
import {Component} from 'angular2/core';

@Component({
    selector: 'my-app',
    template: '<h1>My First Angular 2 App</h1>'
})
export class AppComponent { }※簡単なコンポーネントを作成してexport定義する
app/boot.ts
import {bootstrap}    from 'angular2/platform/browser'
import {AppComponent} from './app.component'

bootstrap(AppComponent);
※基本こいつはbootstrapとなるので変更は不要な感じのものって気がする
index.htmlを作成
index.html
<html>

  <head>
    <title>Angular 2 QuickStart</title>

    <!-- 1. Load libraries -->
    <script src="node_modules/angular2/bundles/angular2-polyfills.js"></script>
    <script src="node_modules/systemjs/dist/system.src.js"></script>
    <script src="node_modules/rxjs/bundles/Rx.js"></script>
    <script src="node_modules/angular2/bundles/angular2.dev.js"></script>

    <!-- 2. Configure SystemJS -->
    <script>
      System.config({
        packages: {
          app: {
            format: 'register',
            defaultExtension: 'js'
          }
        }
      });
      System.import('app/boot')
            .then(null, console.error.bind(console));
    </script>

  </head>

  <!-- 3. Display the application -->
  <body>
    <my-app>Loading...</my-app>
  </body>

</html>
実行
npm start
$ npm start
> angular2-quickstart@1.0.0 start /Volumes/Transcend/samples/angular2-quickstart
> concurrent "npm run tsc:w" "npm run lite"

[0]
[0] > angular2-quickstart@1.0.0 tsc:w /Volumes/Transcend/samples/angular2-quickstart
[0] > tsc -w
[0]
[1]
[1] > angular2-quickstart@1.0.0 lite /Volumes/Transcend/samples/angular2-quickstart
[1] > lite-server
[1]
[1] [BS] Access URLs:
[1]  -------------------------------------
[1]        Local: http://localhost:3000
[1]     External: http://192.168.65.2:3000
[1]  -------------------------------------
[1]           UI: http://localhost:3001
[1]  UI External: http://192.168.65.2:3001
[1]  -------------------------------------
[1] [BS] Serving files from: ./
[1] [BS] Watching files...
[1] 15.12.27 03:58:20 200 GET /./index.html (Unknown - 59ms)
[0] 03:58:20 - Compilation complete. Watching for file changes.
[1] 15.12.27 03:58:21 200 GET /node_modules/angular2/bundles/angular2-polyfills.js (Unknown - 201ms)
[1] 15.12.27 03:58:21 200 GET /node_modules/systemjs/dist/system.src.js (Unknown - 437ms)
[1] 15.12.27 03:58:21 200 GET /node_modules/rxjs/bundles/Rx.js (Unknown - 468ms)
[1] 15.12.27 03:58:21 200 GET /node_modules/angular2/bundles/angular2.dev.js (Unknown - 886ms)
[1] 15.12.27 03:58:21 200 GET /app/boot.js (Unknown - 78ms)
[1] 15.12.27 03:58:22 200 GET /app/app.component.js (Unknown - 337ms)
[1] 15.12.27 03:58:22 404 GET /favicon.ico (Unknown - 11ms)
↓
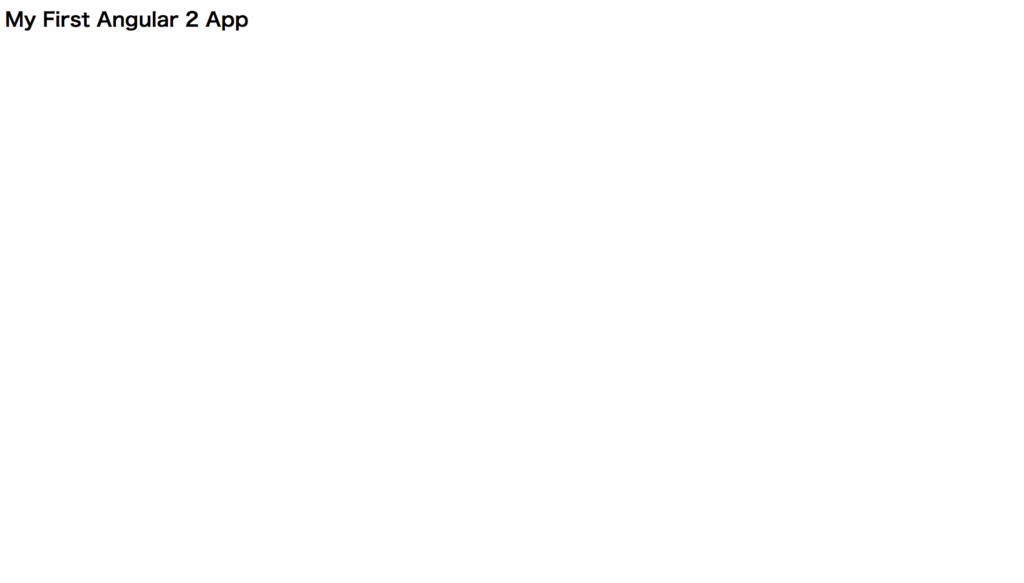
うーん寂しい
けどなんとか動いた
階層
.
├── app
│   ├── app.component.js
│   ├── app.component.js.map
│   ├── app.component.ts
│   ├── boot.js
│   ├── boot.js.map
│   └── boot.ts
├── index.html
├── node_modules
│   ├── angular2
│   ├── concurrently
│   ├── es6-promise
│   ├── es6-shim
│   ├── lite-server
│   ├── reflect-metadata
│   ├── rxjs
│   ├── systemjs
│   ├── typescript
│   └── zone.js
├── package.json
└── tsconfig.json
※ソースマップを使えばデバッグもできるはずなので大丈夫かと
所感
今回はちょっとした触り程度を試した。
nodejsをやり始めたのでなんとなくやり方もわかってきた感じ
TypeScriptでしかチュートリアルしかなかったけどjavascriptでの記法の場合は結構ややこしくなりそうなのでこちらの方が理解しやすいからかと思った。
チュートリアルのほうもちょっと見てみることにする
react-bootstrapを試す
reactの場合はタグの定義方法が異なるの
cssの定義だけならともかくモーダルウィンドウとか使いたい場合はそのままでは使えないので…
準備
プロジェクトに以下を実行
npm install jquery bootstrap react reactify browserify bootstrap-react
grunt設定
初期化
npm init
npm install grunt --save-dev
npm install grunt-browserify grunt-contrib-watch --save-dev
Gruntfile.js
module.exports = function (grunt) {
    var pkg = grunt.file.readJSON('package.json');

    grunt.initConfig({
        browserify : {
            dev: {
                options: {
                    debug: true,
                    transform: ['reactify']
                },
                files: {
                    'js/app.js': 'jsx/**/*.jsx'
                }
            }
        },
        watch : {
            scripts : {
                files : ['jsx/**/*.jsx'],
                tasks : ['browserify:dev']
            }
        }
    });

    Object.keys(pkg.devDependencies).forEach(function (devDependency) {
        if (devDependency.match(/^grunt\-/)) {
            grunt.loadNpmTasks(devDependency);
        }
    });

    grunt.registerTask('default', ['watch']);
};
実装
index.html
<!DOCTYPE html>
<html>
<head>
    <meta charset="UTF-8" />
    <title>Reactjs-TodoApp</title>
    <link rel="stylesheet" href="node_modules/bootstrap/dist/css/bootstrap.min.css" />
</head>
<body>
<div id="content"></div>
<script src="js/app.js"></script>
</body>
</html>
※bootstrapのcssはきちんと入れておく
app.jsx
var $ = require('jquery');
var React = require('react');
var ReactDOM = require('react-dom');

// アラート
var Alert = require("react-bootstrap").Alert;

// ボタン系
var ButtonToolbar = require("react-bootstrap").ButtonToolbar;
var ButtonGroup = require("react-bootstrap").ButtonGroup;
var Button = require("react-bootstrap").Button;

// パンくず系
var Breadcrumb = require("react-bootstrap").Breadcrumb;
var BreadcrumbItem = require("react-bootstrap").BreadcrumbItem;

// モーダルウィンドウ
var Modal = require("react-bootstrap").Modal;

// フォーム系
var ButtonInput = require("react-bootstrap").ButtonInput;
var Input = require("react-bootstrap").Input;

/**
 * SampleApp
 */
var SampleApp = React.createClass({

    render: function() {
        // めんどくさいんでcssはここに書いておく
        var divStyle = {
            padding: '10px',
            width: '800px',
            margin: '0 auto',
            backgroundColor: '#CCC'
        };
        return (
            <div className="sampleoApp" style={divStyle}>
                <h1>SampleApp</h1>
                <hr/>
                <div>
                    <h2>Alert</h2>
                    <Alert1 />
                    <hr/>
                </div>
                <div>
                    <h2>Breadcrumb</h2>
                    <Breadcrumb1 />
                    <hr/>
                </div>
                <div>
                    <h2>ButtonToolbar</h2>
                    <Button1 />
                    <hr/>
                </div>
                <div>
                    <h2>ButtonGroup</h2>
                    <Button2 />
                    <hr/>
                </div>
                <div>
                    <h2>Modal</h2>
                    <Modal1 />
                    <hr/>
                </div>
                <div>
                    <h2>Form</h2>
                    <Form1 />
                    <hr/>
                </div>
            </div>
        );
    }
});

var Alert1 = React.createClass({

    render: function() {
        return (
            <Alert bsStyle="warning">
                <strong>Test</strong> Hello, world!
            </Alert>
        );
    }
});

var Breadcrumb1 = React.createClass({

    render: function() {
        return (
            <Breadcrumb>
                <BreadcrumbItem href="#b1">
                    Home
                </BreadcrumbItem>
                <BreadcrumbItem href="#b1">
                    Library
                </BreadcrumbItem>
                <BreadcrumbItem active>
                    Data
                </BreadcrumbItem>
            </Breadcrumb>
        );
    }
});

var Button1 = React.createClass({

    render: function() {
        return (
            <ButtonToolbar>
                <Button bsStyle="primary">Button1</Button>
                <Button bsStyle="success">Button2</Button>
                <Button bsStyle="info">Button3</Button>
            </ButtonToolbar>
        );
    }
});

var Button2 = React.createClass({

    render: function() {
        return (
            <ButtonGroup>
                <Button bsStyle="primary">Button1</Button>
                <Button bsStyle="success">Button2</Button>
                <Button bsStyle="info">Button3</Button>
            </ButtonGroup>
        );
    }
});

var Modal1 = React.createClass({

    getInitialState() {
        return { showModal: false };
    },

    close() {
        this.setState({ showModal: false });
    },

    open() {
        this.setState({ showModal: true });
    },

    render() {
        return (
            <div>
                <Button
                    bsStyle="primary"
                    bsSize="large"
                    onClick={this.open}
                >
                    モーダルウィンドウオープン
                </Button>

                <Modal show={this.state.showModal} onHide={this.close}>
                    <Modal.Header closeButton>
                        <Modal.Title>タイトル</Modal.Title>
                    </Modal.Header>
                    <Modal.Body>
                        テスとメッセージ
                    </Modal.Body>
                    <Modal.Footer>
                        <Button onClick={this.close}>閉じる</Button>
                    </Modal.Footer>
                </Modal>
            </div>
        );
    }
});

var Form1 = React.createClass({

    render: function() {
        return (
            <form>
                <Input type="text" label="Text" placeholder="Enter text" />
                <Input type="email" label="Email Address" placeholder="Enter email" />
                <Input type="password" label="Password" />
                <Input type="file" label="File" help="[Optional] Block level help text" />
                <Input type="checkbox" label="Checkbox" checked readOnly />
                <Input type="radio" label="Radio" checked readOnly />
                <Input type="select" label="Select" placeholder="select">
                    <option value="select">select</option>
                    <option value="other">...</option>
                </Input>
                <Input type="select" label="Multiple Select" multiple>
                    <option value="select">select (multiple)</option>
                    <option value="other">...</option>
                </Input>
                <Input type="textarea" label="Text Area" placeholder="textarea" />
                <ButtonInput value="Button Input" />
                <ButtonInput type="reset" value="Reset Button" />
                <ButtonInput type="submit" value="Submit Button" />
            </form>
        );
    }
});

ReactDOM.render(
    <SampleApp />,
    document.getElementById('content')
);
結果
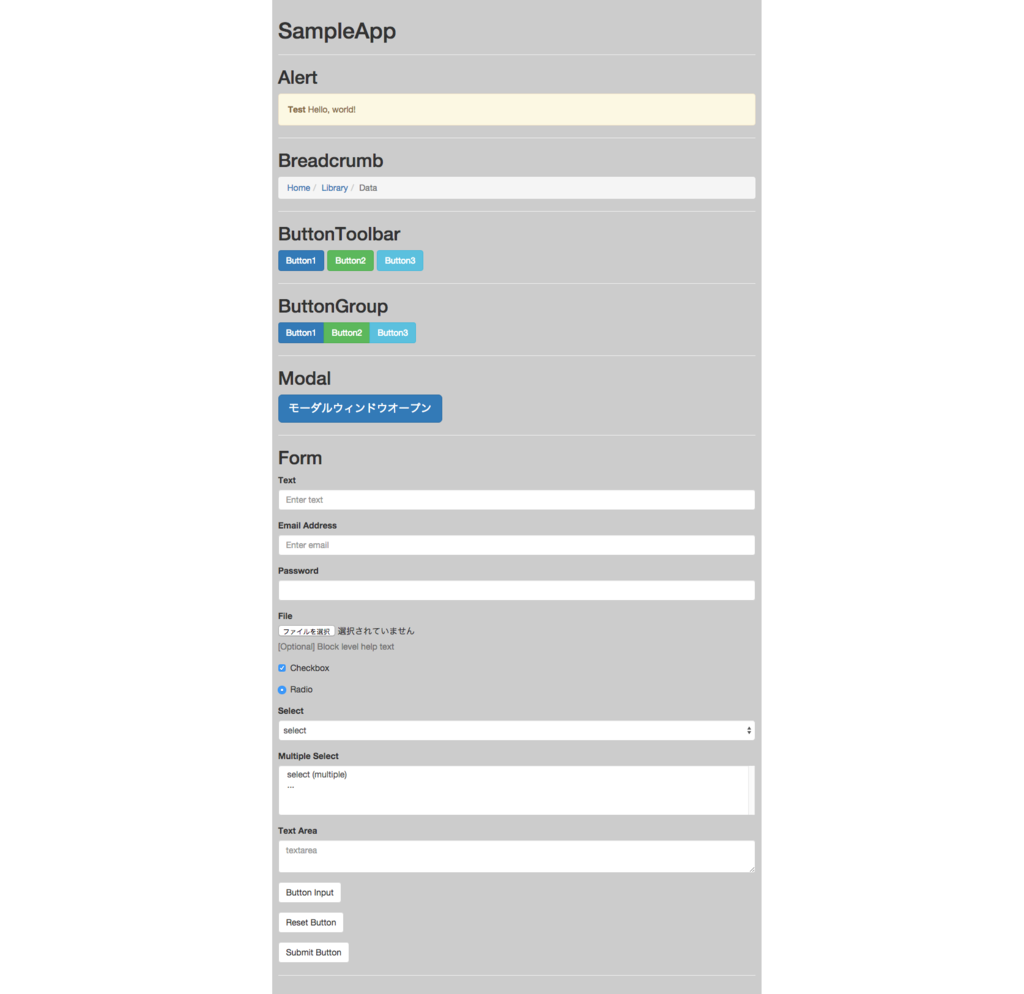
その他のコンポーネントの場所
http://react-components.com/
※必要な奴がない場合はここで探すしかない
所感
ないよりあったほうが良いのでちょっと調べていく必要がある
いろいろなライブラリが出てきてどれを使えばよいのか悩むところだけどいつまでもjquery一択はマズイので少し選択肢を広げていく
うーん、学習コストそこそこ高くなりそう…
