terraformでAWSのVPCを試してみる
コレ見てちょっとやってみようって思いました

ただ、本の通りの場合はGCPとか用意しないといけないので 面倒そうなのでネットの情報を探しながらVPCの構築まで漕ぎ着けたのでメモ
前提条件
AWS CLI
AWS
install
brew tap hashicorp/tap
brew install hashicorp/tap/terraform
↓
% terraform -v
Terraform v1.1.9
on darwin_amd64
%
サンプル
ディレクトリを作成
mkdir sample1
cd sample1
AWSのIAM情報を環境変数へ設定
sample1/terraform.tfvars
aws_access_key = "自身のアカウントのアクセスキー"
aws_secret_key = "自身のアカウントのシークレットキー"
サンプルコードを作成
sample1/main.tf
# このへんはおまじないらしい
terraform {
  required_providers {
    aws = {
      source  = "hashicorp/aws"
      version = "~> 3.27"
    }
  }

  required_version = ">= 0.14.9"
}

# AWS
variable "aws_access_key" {}
variable "aws_secret_key" {}
provider "aws" {
  region     = "ap-northeast-1"
  access_key = var.aws_access_key
  secret_key = var.aws_secret_key
}

# VPC
resource "aws_vpc" "myVPC" {
    cidr_block = "10.1.0.0/16"
    instance_tenancy = "default"
    enable_dns_support = "true"
    enable_dns_hostnames = "false"
    tags = {
      Name = "myVPC"
    }
}
初期化
terraform init
変更内容確認
terraform init
リソース作成
terraform apply
↓
% terraform apply

Terraform used the selected providers to generate the following execution plan. Resource actions are indicated with the following
symbols:
  + create

Terraform will perform the following actions:

  # aws_vpc.myVPC will be created
  + resource "aws_vpc" "myVPC" {
      + arn                                  = (known after apply)
      + cidr_block                           = "10.1.0.0/16"
      + default_network_acl_id               = (known after apply)
      + default_route_table_id               = (known after apply)
      + default_security_group_id            = (known after apply)
      + dhcp_options_id                      = (known after apply)
      + enable_classiclink                   = (known after apply)
      + enable_classiclink_dns_support       = (known after apply)
      + enable_dns_hostnames                 = false
      + enable_dns_support                   = true
      + id                                   = (known after apply)
      + instance_tenancy                     = "default"
      + ipv6_association_id                  = (known after apply)
      + ipv6_cidr_block                      = (known after apply)
      + ipv6_cidr_block_network_border_group = (known after apply)
      + main_route_table_id                  = (known after apply)
      + owner_id                             = (known after apply)
      + tags                                 = {
          + "Name" = "myVPC"
        }
      + tags_all                             = {
          + "Name" = "myVPC"
        }
    }

Plan: 1 to add, 0 to change, 0 to destroy.

Do you want to perform these actions?
  Terraform will perform the actions described above.
  Only 'yes' will be accepted to approve.

  Enter a value: yes

aws_vpc.myVPC: Creating...
aws_vpc.myVPC: Creation complete after 2s [id=vpc-XXXXXXXXXXXXXXXX]

Apply complete! Resources: 1 added, 0 changed, 0 destroyed.
%
↓

リソース削除
terraform destroy
↓
% terraform destroy
aws_vpc.myVPC: Refreshing state... [id=vpc-XXXXXXXXXXXXXXXXXX]

Terraform used the selected providers to generate the following execution plan. Resource actions are indicated with the following
symbols:
  - destroy

Terraform will perform the following actions:

  # aws_vpc.myVPC will be destroyed
  - resource "aws_vpc" "myVPC" {
      - arn                              = "arn:aws:ec2:ap-northeast-1:XXXXXXXXXXXXX:vpc/vpc-080aae0823073b72b" -> null
      - assign_generated_ipv6_cidr_block = false -> null
      - cidr_block                       = "10.1.0.0/16" -> null
      - default_network_acl_id           = "acl-XXXXXXXXXXXXXXXXX" -> null
      - default_route_table_id           = "rtb-XXXXXXXXXXXXXXXXX" -> null
      - default_security_group_id        = "sg-XXXXXXXXXXXXXXXXX" -> null
      - dhcp_options_id                  = "dopt-XXXXXXXXXXXXXXX" -> null
      - enable_classiclink               = false -> null
      - enable_classiclink_dns_support   = false -> null
      - enable_dns_hostnames             = false -> null
      - enable_dns_support               = true -> null
      - id                               = "vpc-XXXXXXXXXXXXXXXX" -> null
      - instance_tenancy                 = "default" -> null
      - ipv6_netmask_length              = 0 -> null
      - main_route_table_id              = "rtb-XXXXXXXXXXXXXXXX" -> null
      - owner_id                         = "XXXXXXXXXXXXXX" -> null
      - tags                             = {
          - "Name" = "myVPC"
        } -> null
      - tags_all                         = {
          - "Name" = "myVPC"
        } -> null
    }

Plan: 0 to add, 0 to change, 1 to destroy.

Do you really want to destroy all resources?
  Terraform will destroy all your managed infrastructure, as shown above.
  There is no undo. Only 'yes' will be accepted to confirm.

  Enter a value: yes

aws_vpc.myVPC: Destroying... [id=vpc-XXXXXXXXXXXXXXXXXXXX]
aws_vpc.myVPC: Destruction complete after 1s

Destroy complete! Resources: 1 destroyed.
%
参考
Terraform簡易チュートリアル on AWS - Qiita 祝 terraform v0.12.0 リリース! upgrade やっていき! - Qiita VPC - Terraformで構築するAWS AWSでTerraformに入門 | DevelopersIO
flutterの環境構築をMacで行う
react-nativeを今までやってきたのでflutterでやってみる
今インストールされていると思われるもの
Xcode12
Java8
Android Studio
cocoapods
brew
今回入れるやつ
flutter sdk
ダウンロード
https://docs.flutter.dev/get-started/installよりMacOSを選択

zipファイルをダウンロード

↓
wget https://storage.googleapis.com/flutter_infra_release/releases/stable/macos/flutter_macos_2.10.4-stable.zip
解凍して任意の場所へ配置
unzip flutter_macos_2.10.4-stable.zip
mv flutter ~/work/.
※「~/work/flutter」へ移動
パス設定
~/.zshrc
# flutter
export PATH=$PATH:$HOME/work/flutter/bin
再読み込み
source ~/.zshrc
↓
% flutter
Manage your Flutter app development.

Common commands:

  flutter create <output directory>
    Create a new Flutter project in the specified directory.

  flutter run [options]
    Run your Flutter application on an attached device or in an emulator.

Usage: flutter <command> [arguments]

Global options:
-h, --help                  Print this usage information.
-v, --verbose               Noisy logging, including all shell commands executed.
                            If used with "--help", shows hidden options. If used with "flutter doctor", shows additional diagnostic information. (Use "-vv" to force verbose logging in
                            those cases.)
-d, --device-id             Target device id or name (prefixes allowed).
    --version               Reports the version of this tool.
    --suppress-analytics    Suppress analytics reporting when this command runs.

Available commands:

Flutter SDK
  bash-completion   Output command line shell completion setup scripts.
  channel           List or switch Flutter channels.
  config            Configure Flutter settings.
  doctor            Show information about the installed tooling.
  downgrade         Downgrade Flutter to the last active version for the current channel.
  precache          Populate the Flutter tool's cache of binary artifacts.
  upgrade           Upgrade your copy of Flutter.

Project
  analyze           Analyze the project's Dart code.
  assemble          Assemble and build Flutter resources.
  build             Build an executable app or install bundle.
  clean             Delete the build/ and .dart_tool/ directories.
  create            Create a new Flutter project.
  drive             Run integration tests for the project on an attached device or emulator.
  format            Format one or more Dart files.
  gen-l10n          Generate localizations for the current project.
  pub               Commands for managing Flutter packages.
  run               Run your Flutter app on an attached device.
  test              Run Flutter unit tests for the current project.

Tools & Devices
  attach            Attach to a running app.
  custom-devices    List, reset, add and delete custom devices.
  devices           List all connected devices.
  emulators         List, launch and create emulators.
  install           Install a Flutter app on an attached device.
  logs              Show log output for running Flutter apps.
  screenshot        Take a screenshot from a connected device.
  symbolize         Symbolize a stack trace from an AOT-compiled Flutter app.

Run "flutter help <command>" for more information about a command.
Run "flutter help -v" for verbose help output, including less commonly used options.

  ╔════════════════════════════════════════════════════════════════════════════╗
  ║                 Welcome to Flutter! - https://flutter.dev                  ║
  ║                                                                            ║
  ║ The Flutter tool uses Google Analytics to anonymously report feature usage ║
  ║ statistics and basic crash reports. This data is used to help improve      ║
  ║ Flutter tools over time.                                                   ║
  ║                                                                            ║
  ║ Flutter tool analytics are not sent on the very first run. To disable      ║
  ║ reporting, type 'flutter config --no-analytics'. To display the current    ║
  ║ setting, type 'flutter config'. If you opt out of analytics, an opt-out    ║
  ║ event will be sent, and then no further information will be sent by the    ║
  ║ Flutter tool.                                                              ║
  ║                                                                            ║
  ║ By downloading the Flutter SDK, you agree to the Google Terms of Service.  ║
  ║ Note: The Google Privacy Policy describes how data is handled in this      ║
  ║ service.                                                                   ║
  ║                                                                            ║
  ║ Moreover, Flutter includes the Dart SDK, which may send usage metrics and  ║
  ║ crash reports to Google.                                                   ║
  ║                                                                            ║
  ║ Read about data we send with crash reports:                                ║
  ║ https://flutter.dev/docs/reference/crash-reporting                         ║
  ║                                                                            ║
  ║ See Google's privacy policy:                                               ║
  ║ https://policies.google.com/privacy                                        ║
  ╚════════════════════════════════════════════════════════════════════════════╝


%
環境構築
flutter doctorでチェックし、不足分を追加
% flutter doctor
Running "flutter pub get" in flutter_tools...                       4.9s
Doctor summary (to see all details, run flutter doctor -v):
[✓] Flutter (Channel stable, 2.10.4, on macOS 12.3 21E230 darwin-x64, locale ja-JP)
[!] Android toolchain - develop for Android devices (Android SDK version 30.0.2)
    ! Some Android licenses not accepted.  To resolve this, run: flutter doctor --android-licenses
[✓] Xcode - develop for iOS and macOS (Xcode 13.3)
[✓] Chrome - develop for the web
[✓] Android Studio (version 4.1)
[✓] IntelliJ IDEA Ultimate Edition (version 2018.2.5)
[✓] VS Code (version 1.65.2)
[✓] Connected device (1 available)
[✓] HTTP Host Availability

! Doctor found issues in 1 category.
%
androidのライセンス同意?
flutter doctor --android-licenses
⇨ 何回か「y/N」を聞いてくるので全て「y」とする
android studioにflutterのプラグインを入れる

再確認
 % flutter doctor
Doctor summary (to see all details, run flutter doctor -v):
[✓] Flutter (Channel stable, 2.10.4, on macOS 12.3 21E230 darwin-x64, locale ja-JP)
[✓] Android toolchain - develop for Android devices (Android SDK version 30.0.2)
[✓] Xcode - develop for iOS and macOS (Xcode 13.3)
[✓] Chrome - develop for the web
[✓] Android Studio (version 4.1)
[✓] IntelliJ IDEA Ultimate Edition (version 2018.2.5)
[✓] VS Code (version 1.65.2)
[✓] Connected device (1 available)
[✓] HTTP Host Availability

• No issues found!
%
iOS設定
コマンドラインツールをインストール
sudo xcode-select --switch /Applications/Xcode.app/Contents/Developer
ライセンスに同意する
sudo xcodebuild -license
パッケージインストール
brew install --HEAD usbmuxd
brew link usbmuxd
brew install --HEAD libimobiledevice
brew tap kozyrap/libimobiledevice
brew install kozyrap/libimobiledevice/libimobiledevice --HEAD

brew install ideviceinstaller
brew install ios-deploy
pod setup
pod setup
あらかじめシミュレーターを起動する
open -a Simulator
※Xcodeからの起動でも可能
プロジェクトの作成
任意のディレクトリを作成
mkdir ~/work/flutter_apps
cd  ~/work/flutter_apps
プロジェクト作成
% flutter create my_app01
Signing iOS app for device deployment using developer identity: "Apple Development: zzzzzzzzzzzzzzzzzzzzzz (xxxxxxxxxxxx)"
Creating project my_app01...
Running "flutter pub get" in my_app01...                            4.1s
Wrote 96 files.

All done!
In order to run your application, type:

  $ cd my_app01
  $ flutter run

Your application code is in my_app01/lib/main.dart.

%
↓
% cd my_app01
% tree
.
├── README.md
├── analysis_options.yaml
├── android
│   ├── app
│   │   ├── build.gradle
│   │   └── src
│   │       ├── debug
│   │       │   └── AndroidManifest.xml
│   │       ├── main
│   │       │   ├── AndroidManifest.xml
│   │       │   ├── java
│   │       │   │   └── io
│   │       │   │       └── flutter
│   │       │   │           └── plugins
│   │       │   │               └── GeneratedPluginRegistrant.java
│   │       │   ├── kotlin
│   │       │   │   └── com
│   │       │   │       └── example
│   │       │   │           └── my_app01
│   │       │   │               └── MainActivity.kt
│   │       │   └── res
│   │       │       ├── drawable
│   │       │       │   └── launch_background.xml
│   │       │       ├── drawable-v21
│   │       │       │   └── launch_background.xml
│   │       │       ├── mipmap-hdpi
│   │       │       │   └── ic_launcher.png
│   │       │       ├── mipmap-mdpi
│   │       │       │   └── ic_launcher.png
│   │       │       ├── mipmap-xhdpi
│   │       │       │   └── ic_launcher.png
│   │       │       ├── mipmap-xxhdpi
│   │       │       │   └── ic_launcher.png
│   │       │       ├── mipmap-xxxhdpi
│   │       │       │   └── ic_launcher.png
│   │       │       ├── values
│   │       │       │   └── styles.xml
│   │       │       └── values-night
│   │       │           └── styles.xml
│   │       └── profile
│   │           └── AndroidManifest.xml
│   ├── build.gradle
│   ├── gradle
│   │   └── wrapper
│   │       ├── gradle-wrapper.jar
│   │       └── gradle-wrapper.properties
│   ├── gradle.properties
│   ├── gradlew
│   ├── gradlew.bat
│   ├── local.properties
│   ├── my_app01_android.iml
│   └── settings.gradle
├── ios
│   ├── Flutter
│   │   ├── AppFrameworkInfo.plist
│   │   ├── Debug.xcconfig
│   │   ├── Generated.xcconfig
│   │   ├── Release.xcconfig
│   │   └── flutter_export_environment.sh
│   ├── Runner
│   │   ├── AppDelegate.swift
│   │   ├── Assets.xcassets
│   │   │   ├── AppIcon.appiconset
│   │   │   │   ├── Contents.json
│   │   │   │   ├── Icon-App-1024x1024@1x.png
│   │   │   │   ├── Icon-App-20x20@1x.png
│   │   │   │   ├── Icon-App-20x20@2x.png
│   │   │   │   ├── Icon-App-20x20@3x.png
│   │   │   │   ├── Icon-App-29x29@1x.png
│   │   │   │   ├── Icon-App-29x29@2x.png
│   │   │   │   ├── Icon-App-29x29@3x.png
│   │   │   │   ├── Icon-App-40x40@1x.png
│   │   │   │   ├── Icon-App-40x40@2x.png
│   │   │   │   ├── Icon-App-40x40@3x.png
│   │   │   │   ├── Icon-App-60x60@2x.png
│   │   │   │   ├── Icon-App-60x60@3x.png
│   │   │   │   ├── Icon-App-76x76@1x.png
│   │   │   │   ├── Icon-App-76x76@2x.png
│   │   │   │   └── Icon-App-83.5x83.5@2x.png
│   │   │   └── LaunchImage.imageset
│   │   │       ├── Contents.json
│   │   │       ├── LaunchImage.png
│   │   │       ├── LaunchImage@2x.png
│   │   │       ├── LaunchImage@3x.png
│   │   │       └── README.md
│   │   ├── Base.lproj
│   │   │   ├── LaunchScreen.storyboard
│   │   │   └── Main.storyboard
│   │   ├── GeneratedPluginRegistrant.h
│   │   ├── GeneratedPluginRegistrant.m
│   │   ├── Info.plist
│   │   └── Runner-Bridging-Header.h
│   ├── Runner.xcodeproj
│   │   ├── project.pbxproj
│   │   ├── project.xcworkspace
│   │   │   ├── contents.xcworkspacedata
│   │   │   └── xcshareddata
│   │   │       ├── IDEWorkspaceChecks.plist
│   │   │       └── WorkspaceSettings.xcsettings
│   │   └── xcshareddata
│   │       └── xcschemes
│   │           └── Runner.xcscheme
│   └── Runner.xcworkspace
│       ├── contents.xcworkspacedata
│       └── xcshareddata
│           ├── IDEWorkspaceChecks.plist
│           └── WorkspaceSettings.xcsettings
├── lib
│   └── main.dart
├── my_app01.iml
├── pubspec.lock
├── pubspec.yaml
├── test
│   └── widget_test.dart
├── web
│   ├── favicon.png
│   ├── icons
│   │   ├── Icon-192.png
│   │   ├── Icon-512.png
│   │   ├── Icon-maskable-192.png
│   │   └── Icon-maskable-512.png
│   ├── index.html
│   └── manifest.json
└── windows
    ├── CMakeLists.txt
    ├── flutter
    │   ├── CMakeLists.txt
    │   ├── generated_plugin_registrant.cc
    │   ├── generated_plugin_registrant.h
    │   └── generated_plugins.cmake
    └── runner
        ├── CMakeLists.txt
        ├── Runner.rc
        ├── flutter_window.cpp
        ├── flutter_window.h
        ├── main.cpp
        ├── resource.h
        ├── resources
        │   └── app_icon.ico
        ├── runner.exe.manifest
        ├── utils.cpp
        ├── utils.h
        ├── win32_window.cpp
        └── win32_window.h

48 directories, 96 files
 %
起動
% flutter run
↓

※シミュレータを起動していないとブラウザが起動します
AWSのRDSのログをcloudwatchへ流したい
やりたいこと
RDS(MySQL)のクエリーのログをcloudwatchへ送信したい
構成図

RDSのセットアップについて
以下とほぼ同じやり方を利用する m-shige1979.hatenablog.com
やること
- 上記の様にしたRDSを準備
- パラメータグループを作成
- パラメータを設定
ログ出力対応
RDSを準備する

パラメータグループを作成する
パラメータグループの新規作成ボタンを押下
 ↓
↓
MySQLのデフォルトのパラメータグループを作成する
 ↓
↓
作成したパラメータグループを編集する
 ↓
↓
値を変更する
・general_log=1
 ・slow_query_log=1
 ・log_output=FILE
 ・long_query_time

※監査ログはなんか別途設定があるみたいですが、今回は見送り
RDSの設定でパラメータグループを設定
RDSインスタンスを選択して、変更ボタンを押下
 ↓
↓
変更をおこなったあと一番下の「続行」を押下する
・パラメータグループを変更
 ・ログのエクスポートにチェックする
 ↓
↓
変更内容及び、変更適用タイミングを確認して変更を実施する
 ↓
↓
待つ

cloudwatch logsで確認
errorはcloudwatch logsで作成されていることを確認
 ↓
↓
一旦、RDSを再起動する
 ↓
↓
できたのを確認

参考記事
RDSのMySQL/MariaDBでログをCloudWatch Logsへ出力可能になりました | DevelopersIO RDS MySQLのログをCloudWatch Logsに出力する - DENET 技術ブログ 【RDS(Aurora) for MySQL】ログをCloudWatchLogsに出力している気になっていた件 - サーバーワークスエンジニアブログ
AWSにWAFを設定する
今回

WAF?
簡単にいうと特定のURLのリクエストを弾く仕組みのよう
AWS提供のOWASP Top 10 テンプレートファイル
以下のURLよりダウンロード
Use AWS WAF to Mitigate OWASP’s Top 10 Web Application Vulnerabilities
やること
- cloudformationのIAMロールを作成
- cloudformationのスタックを作成
- WAFの設定
手順
cloudformationのIAMロールを作成
ロールメニューよりロールを作成をクリック
 ↓
↓
ユースケースに「cloudformation」を指定
 ↓
↓
権限を指定するのは今回めんどいのでadmin権限を指定
 ↓
↓
タグを設定
 ↓
↓
作成する
 ↓
↓

cloudformationのスタックを作成
スタックの作成
 ↓
↓
テンプレートを指定する
 ↓
↓
パラメータを指定


 ↓
↓
スタックオプションの設定


 ↓
↓
レビュー


 ↓
↓
 ↓
↓
しばらく待つと完了

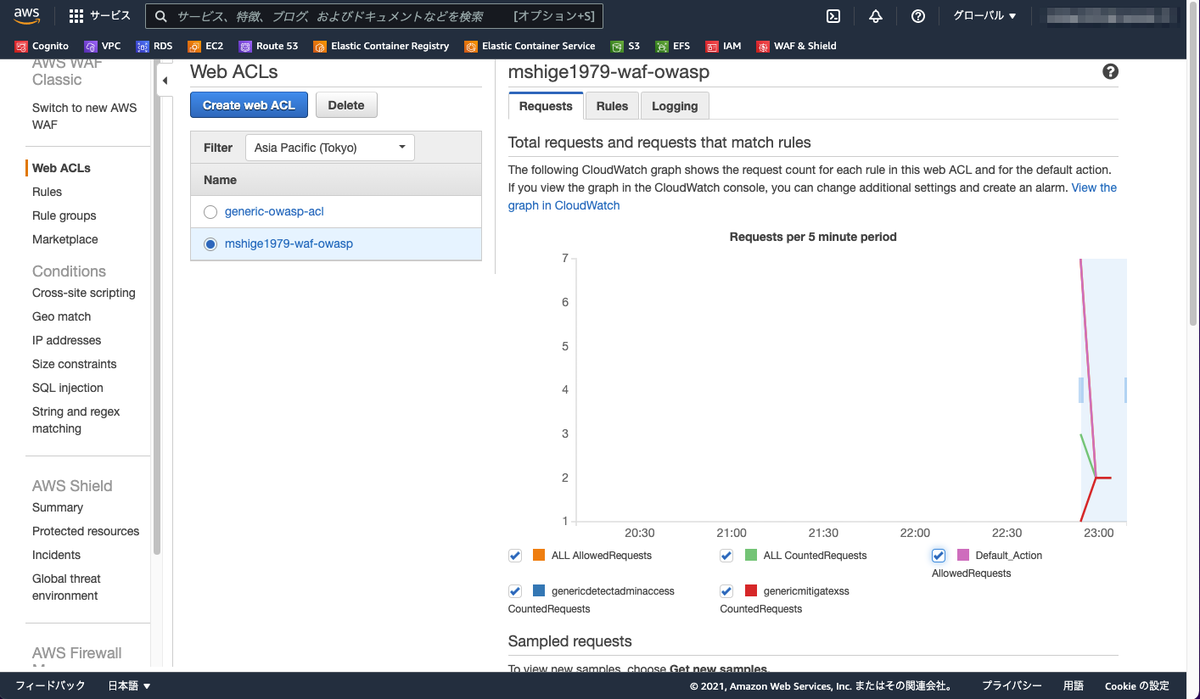
WAFの設定
Swtitch to AWS WAF Classicを選択する
 ↓
↓
作成したACLを選択し、ACLを作成
 ↓
↓
パラメータを設定
 ↓
↓


 ↓
↓
ルールを作成

 ↓
↓
確認

 ↓
↓
作成完了

 ↓
↓
ロードバランサに設定されていることを確認

確認
参考
AWSセキュリティ【AWS WAF】:AWS提供のOWASP Top 10 テンプレートからセットアップ | ミコ-ラボ https://blog.e2info.co.jp/2019/03/14/aws-waf%E3%81%A7owasp-top-10%E3%81%AE%E5%AF%BE%E5%BF%9C/
所感
良い感じ 一部は制限付きで許可したりログを出したりする方法は今後調べる ロードバランサの料金がもったいないのでそろそろ消す
AWSのECSを構築するその4(ECS設定)
完成予定

今回やること
- クラスターの作成
- タスク定義の作成
- サービスの作成
- Route53設定
IAMロールの作成
ロールを作成を選択

ユースケースに「Elastic Container Service」を選択
 ↓
↓

対象のポリシー(AmazonECSTaskExecutionRolePolicy)を選択

タグ

確認

クラスターの作成
クラスターの作成を選択

テンプレートを作成


クラスターの設定

クラスターの作成

タスク定義の作成
新しいタスク定義の作成を選択する

起動タイプの作成


タスク定義の設定


 ↓
↓
 ↓
↓

 ↓
↓

サービスを作成
クラスターのサービスを作成

サービスのパラメータを設定


ネットワーク設定


オートスケール

確認


 ↓
↓

Route53設定
レコードを追加
 ↓
↓

関連記事
m-shige1979.hatenablog.com m-shige1979.hatenablog.com m-shige1979.hatenablog.com m-shige1979.hatenablog.com
AWSのECSを構築するその3(ECR作成)
完成予定
今回

今回やること
- ECRの作成
- Dockerfile作成
- dockerビルド、動作確認
- ECRへタグづけ、Push
ECRの作成
「使用方法」を選択

リポジトリパラメータを設定
 ↓
↓

ポリシーを作成&割り当て
ポリシーを作成を選択

権限を設定


タグ

確認

対応ユーザーにポリシーを付与
 ↓
↓

Dockerfileを作成&ビルド
Dockerfile作成
Dockerfile
# image
FROM nginx:alpine

# 設定ファイルをコピー
COPY conf.d/default.conf /etc/nginx/conf.d/default.conf

# index.html
RUN mkdir -p /var/www/htdocs
COPY htdocs/index.html /var/www/htdocs/index.html
conf.d/default.conf
server {
       listen 80;
       listen [::]:80;

       server_name  localhost;
       root /var/www/htdocs;
       index index.html;

       location / {
               try_files $uri $uri/ =404;
       }
}
htdocs/index.html
<html>
testdata
</html>
ビルド
docker build -t mshge1979-frontend .
動作確認
docker run -it -p 8080:80 --rm --name test1 \
  mshge1
↓
% curl http://localhost:8080
<html>
testdata
</html>
%
AWS CLIインストール
https://awscli.amazonaws.com/AWSCLIV2.pkg
※AWS CLI バージョン 2 のインストール、更新、アンインストール - AWS Command Line Interface
アクセスキー、シークレットアクセスキー設定
% aws configure
AWS Access Key ID [None]: [アクセスキー情報]
AWS Secret Access Key [None]: [シークレットアクセスキー情報]
Default region name [None]: ap-northeast-1
Default output format [None]: json
 %
ログイン
% aws ecr get-login-password --profile [プロファイル名] | docker login --username AWS --password-stdin [識別ID].dkr.ecr.ap-northeast-1.amazonaws.com
Login Succeeded
%
※複数のプロファイルを設定していたらうまく認識されないのでプロファイルを設定した方が上手くいく
ECRのタグづけ
docker tag mshge1979-frontend:latest [識別ID].dkr.ecr.ap-northeast-1.amazonaws.com/mshge1979-frontend:0.0.1
ECRへプッシュ
docker push [識別ID].dkr.ecr.ap-northeast-1.amazonaws.com/mshge1979-frontend:0.0.1
確認

関連記事
m-shige1979.hatenablog.com m-shige1979.hatenablog.com m-shige1979.hatenablog.com m-shige1979.hatenablog.com
AWSのECSを構築するその2(ドメイン取得〜ロードバランサ構築)
完成予定
今回予定

今回やること
freenom でドメイン取得
登録処理は割愛
一部のプロバイダでは登録できないため、Amazon Workspacesや海外のVPN経由でドメインを取得

Route53にホストゾーンを作成
ホストゾーンの作成を選択

ドメインを設定


生成されたネームサーバへ設定

freenomのネームサーバを更新

ACM証明書要求
証明書をリクエスト

パブリック証明書をリクエスト

パラメータ設定


証明書を表示を選択する

Route53にレコードを作成する

 ↓
↓

しばらく待つとステータスが更新される

セキュリティグループの作成
外部通信用(ロードバランサが受け付けるやつ)
 ↓
↓


外部通信用(ロードバランサ経由でECSがうけるやつ)
 ↓
↓


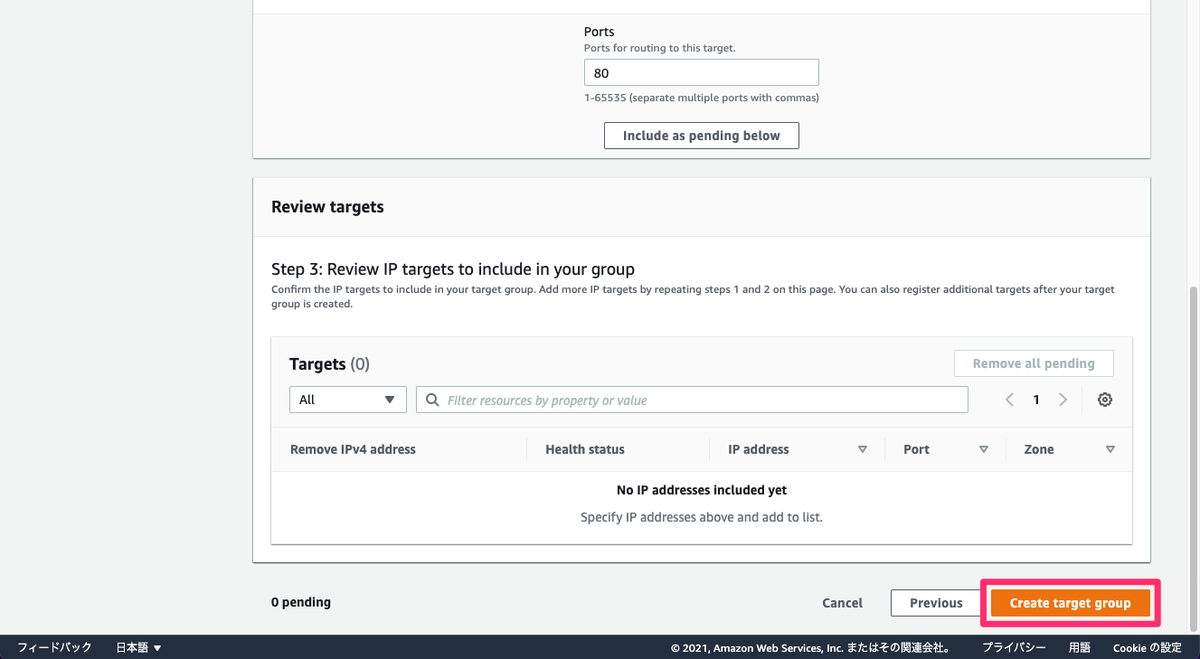
ターゲットグループ作成
ターゲットグループを作成する

パラメータ設定


ターゲットはECSで設定するため、ここでは登録しない

ロードバランサ作成
ロードバランサを作成

ALBを選択


パラメータ設定


関連記事
m-shige1979.hatenablog.com m-shige1979.hatenablog.com m-shige1979.hatenablog.com m-shige1979.hatenablog.com