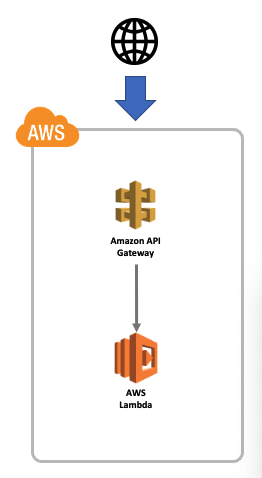
AWSのLambdaとAPIGatwwayを連携
作りたいもの
要約
なんか簡単な処理をAPIを経由してアクセスしたい
↓
lambdaでなんかできそう
↓
postmanで再現するにはホストがいる
↓
API Gatewayでいけそう⇦今ここ
↓
多分、APIGateway+Lambdaの連携でできるかも
lambdaは色々なAWSサービスのトリガーで動作することができる
やること
1. APIGatewayを作成
 ↓
↓
 ↓
↓
 ↓
↓

2. APIのリソースを作成
 ↓
↓
 ↓
↓
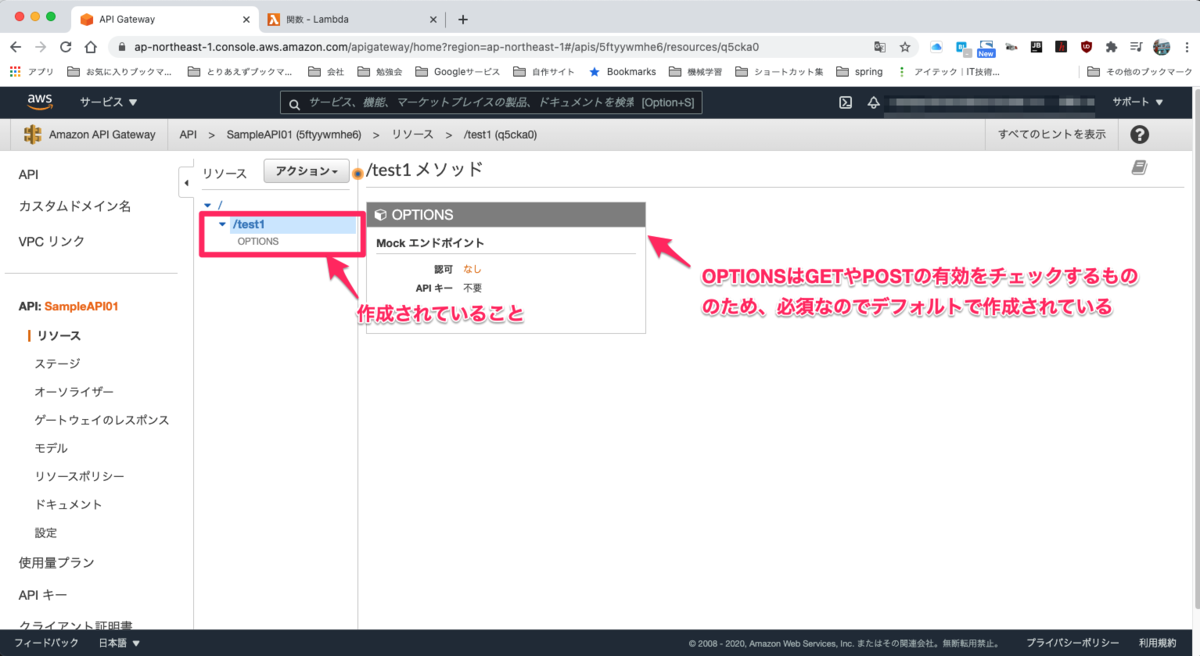
3. APIのメソッドを作成
 ↓
↓
 ↓
↓

4. lambdaを作成
 ↓
↓
 ↓
↓
 ↓
↓
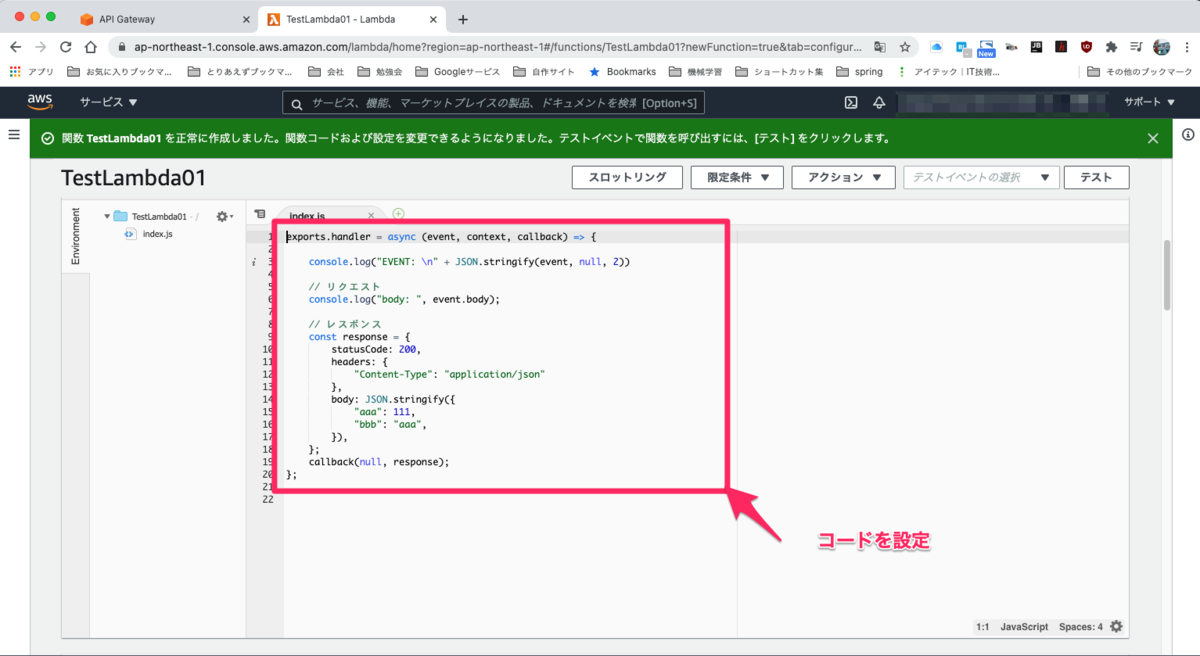
添付コード
exports.handler = async (event, context, callback) => {

    console.log("EVENT: \n" + JSON.stringify(event, null, 2))

    // リクエスト
    console.log("body: ", event.body);

    // レスポンス
    const response = {
        statusCode: 200,
        headers: {
            "Content-Type": "application/json"
        },
        body: JSON.stringify({
            "aaa": 111,
            "bbb": "aaa",
        }),
    };
    callback(null, response);
};
↓

5. APIとLambdaを紐付けデプロイ
 ↓
↓
 ↓
↓
 ↓
↓
 ↓
↓
 ↓
↓

6. curlで確認
 % curl https://5ftyywmhe6.execute-api.ap-northeast-1.amazonaws.com/dev/test1
{"aaa":111,"bbb":"aaa"}%
 %
できた ^_^
おまけ
lambdaからみたAPI Gatewayからのeventの中身
{
    "resource": "/test1",
    "path": "/test1",
    "httpMethod": "GET",
    "headers": {
        "Accept": "*/*",
        "CloudFront-Forwarded-Proto": "https",
        "CloudFront-Is-Desktop-Viewer": "true",
        "CloudFront-Is-Mobile-Viewer": "false",
        "CloudFront-Is-SmartTV-Viewer": "false",
        "CloudFront-Is-Tablet-Viewer": "false",
        "CloudFront-Viewer-Country": "JP",
        "Host": "一応隠す",
        "User-Agent": "curl/7.64.1",
        "Via": "一応隠す",
        "X-Amz-Cf-Id": "一応隠す",
        "X-Amzn-Trace-Id": "一応隠す",
        "X-Forwarded-For": "一応隠す",
        "X-Forwarded-Port": "443",
        "X-Forwarded-Proto": "https"
    },
    "multiValueHeaders": {
        "Accept": [
            "*/*"
        ],
        "CloudFront-Forwarded-Proto": [
            "https"
        ],
        "CloudFront-Is-Desktop-Viewer": [
            "true"
        ],
        "CloudFront-Is-Mobile-Viewer": [
            "false"
        ],
        "CloudFront-Is-SmartTV-Viewer": [
            "false"
        ],
        "CloudFront-Is-Tablet-Viewer": [
            "false"
        ],
        "CloudFront-Viewer-Country": [
            "JP"
        ],
        "Host": [
            "一応隠す"
        ],
        "User-Agent": [
            "curl/7.64.1"
        ],
        "Via": [
            "一応隠す"
        ],
        "X-Amz-Cf-Id": [
            "一応隠す"
        ],
        "X-Amzn-Trace-Id": [
            "一応隠す"
        ],
        "X-Forwarded-For": [
            "一応隠す"
        ],
        "X-Forwarded-Port": [
            "443"
        ],
        "X-Forwarded-Proto": [
            "https"
        ]
    },
    "queryStringParameters": null,
    "multiValueQueryStringParameters": null,
    "pathParameters": null,
    "stageVariables": null,
    "requestContext": {
        "resourceId": "一応隠す",
        "resourcePath": "/test1",
        "httpMethod": "GET",
        "extendedRequestId": "一応隠す",
        "requestTime": "30/Dec/2020:06:47:19 +0000",
        "path": "/dev/test1",
        "accountId": "一応隠す",
        "protocol": "HTTP/1.1",
        "stage": "dev",
        "domainPrefix": "一応隠す",
        "requestTimeEpoch": 一応隠す,
        "requestId": "一応隠す",
        "identity": {
            "cognitoIdentityPoolId": null,
            "accountId": null,
            "cognitoIdentityId": null,
            "caller": null,
            "sourceIp": "一応隠す",
            "principalOrgId": null,
            "accessKey": null,
            "cognitoAuthenticationType": null,
            "cognitoAuthenticationProvider": null,
            "userArn": null,
            "userAgent": "curl/7.64.1",
            "user": null
        },
        "domainName": "一応隠す",
        "apiId": "一応隠す"
    },
    "body": null,
    "isBase64Encoded": false
}
リクエストパラメータ
GETの場合は「queryStringParameters」とかに、POSTの場合は「body」に入るみたい
    "queryStringParameters": null,
    "multiValueQueryStringParameters": null,
    "body": null,
Lambda単体で動作検証したい場合はここにパラメータ突っ込めば良いかな・・・
次に作りたいもの
とりあえず、 S3にファイルが置かれたら起動するやつとか作ってみたい
react-nativeでタブナビゲーションを実装
作成したやつ
参考情報
React Navigationのタブナビゲーションをカスタマイズしてみよう! - bagelee(ベーグリー) createMaterialTopTabNavigator | React Navigation
github
react-native_samples/sampleAppNavigation01 at main · mshige1979/react-native_samples · GitHub
コード全体
/**
 * Sample React Native App
 * https://github.com/facebook/react-native
 *
 * @format
 * @flow strict-local
 */

import React, {useState} from 'react';
import {View, StyleSheet, StatusBar, Platform} from 'react-native';

import {NavigationContainer} from '@react-navigation/native';
import {createMaterialTopTabNavigator} from '@react-navigation/material-top-tabs';

// タブエリア
import AppTabBar from './src/components/AppTabBar';

// サンプルページ
import Home from './src/screens/home';
import Profile from './src/screens/profile';
import MyPage from './src/screens/mypage';

// タブコンポーネント
const TopTabs = createMaterialTopTabNavigator();
const TopTabsScreen = () => {
  const [swipeEnabled, setSwipeEnabled] = useState(true);

  // Profileの場合は左右にスワイプする
  // Profile以外の場合はスワイプしない
  // 参考:https://stackoverflow.com/questions/63611393/react-native-material-top-tab-navigator-swipe-disable-depending-on-screens
  const focusCheck = ({navigation, route}) => ({
    focus: () => {
      console.log('focus: ', route.name);
      setSwipeEnabled(route.name === 'Profile');
    },
  });

  return (
    <TopTabs.Navigator
      swipeEnabled={swipeEnabled} // スワイプによる移動を制御(true: スワイプ移動、false: 移動しない)
      tabBar={(props) => <AppTabBar {...props} />}
      style={{
        marginTop: Platform.select({
          ios: 50,
          android: 0,
        }),
      }}>
      <TopTabs.Screen name="Home" component={Home} listeners={focusCheck} />
      <TopTabs.Screen
        name="Profile"
        component={Profile}
        listeners={focusCheck}
      />
      <TopTabs.Screen name="MyPage" component={MyPage} listeners={focusCheck} />
    </TopTabs.Navigator>
  );
};

// メイン
const App = () => {
  return (
    <>
      <NavigationContainer>
        <TopTabsScreen />
      </NavigationContainer>
      <StatusBar barStyle="dark-content" />
    </>
  );
};

const styles = StyleSheet.create({});

export default App;
1.画面を作成
import React, {useEffect} from 'react';
import {View, Text, StyleSheet, Button} from 'react-native';

const Home = ({navigation, route}) => {
  return (
    <View style={styles.container}>
      <View>
        <Text>Home</Text>
      </View>
      <View
        style={{
          margin: 10,
        }}>
        <Text>Topタブのサンプル このタブはスワイプしない</Text>
      </View>
      <View>
        <Button
          title="Profileへ移動"
          onPress={() => {
            navigation.jumpTo('Profile');
          }}
        />
      </View>
    </View>
  );
};

const styles = StyleSheet.create({
  container: {
    flex: 1,
    justifyContent: 'center',
    alignItems: 'center',
  },
});

export default Home;
こーいうものを作成する
2. タブコンポーネントを作成
1で作成したコンポーネントを設定する。 基本2〜5位がちょうどいい感じ
// タブコンポーネント
const TopTabs = createMaterialTopTabNavigator();
const TopTabsScreen = () => {
  const [swipeEnabled, setSwipeEnabled] = useState(true);

  // Profileの場合は左右にスワイプする
  // Profile以外の場合はスワイプしない
  // 参考:https://stackoverflow.com/questions/63611393/react-native-material-top-tab-navigator-swipe-disable-depending-on-screens
  const focusCheck = ({navigation, route}) => ({
    focus: () => {
      console.log('focus: ', route.name);
      setSwipeEnabled(route.name === 'Profile');
    },
  });

  return (
    <TopTabs.Navigator
      swipeEnabled={swipeEnabled} // スワイプによる移動を制御(true: スワイプ移動、false: 移動しない)
      tabBar={(props) => <AppTabBar {...props} />}
      style={{
        marginTop: Platform.select({
          ios: 50,
          android: 0,
        }),
      }}>
      <TopTabs.Screen name="Home" component={Home} listeners={focusCheck} />
      <TopTabs.Screen
        name="Profile"
        component={Profile}
        listeners={focusCheck}
      />
      <TopTabs.Screen name="MyPage" component={MyPage} listeners={focusCheck} />
    </TopTabs.Navigator>
  );
};
swipeEnabled
⇨ 左右にスワイプするための設定値、trueでスワイプする、falseでしない
フォーカスイベントで任意の画面のみスワイプするように制御可能
  // Profileの場合は左右にスワイプする
  // Profile以外の場合はスワイプしない
  // 参考:https://stackoverflow.com/questions/63611393/react-native-material-top-tab-navigator-swipe-disable-depending-on-screens
  const focusCheck = ({navigation, route}) => ({
    focus: () => {
      console.log('focus: ', route.name);
      setSwipeEnabled(route.name === 'Profile');
    },
  });
3.メイン画面に組み込む
// メイン
const App = () => {
  return (
    <>
      <NavigationContainer>
        <TopTabsScreen />
      </NavigationContainer>
      <StatusBar barStyle="dark-content" />
    </>
  );
};
おまけ
独自タブバー
標準でスタイルが適用されているが、一部独自に組み込みたい場合
import React from 'react';
import {View, Text, TouchableOpacity} from 'react-native';
import Animated from 'react-native-reanimated';

// 独自タブ
// 参考:https://bagelee.com/programming/react-native/react-navigation-customize/
// 参考:https://reactnavigation.org/docs/material-top-tab-navigator
const AppTabBar = ({state, descriptors, navigation, position}) => {
  const {routes, index} = state;

  const {
    containerStyle,
    tabStyle,
    selectedTabStyle,
    textStyle,
    selectedTextStyle,
  } = styles;

  //console.log(position);
  //console.log(descriptors);

  return (
    <View style={containerStyle}>
      {routes.map((route, idx) => {
        //const inputRange = state.routes.map((_, i) => i);
        //console.log(inputRange);

        // 選択しているタブ
        if (index === idx) {
          return (
            <View key={idx} style={[tabStyle, selectedTabStyle]}>
              <Text style={[textStyle, selectedTextStyle]}>
                {routes[idx].name}
              </Text>
            </View>
          );
        }

        // 他のタブ
        return (
          <TouchableOpacity
            style={tabStyle}
            key={idx}
            onPress={() => {
              // タップしたら他のタブへ切り替え
              navigation.navigate(route.name);
            }}>
            <Animated.Text style={[textStyle]}>
              {routes[idx].name}
            </Animated.Text>
          </TouchableOpacity>
        );
      })}
    </View>
  );
};

const styles = {
  containerStyle: {
    //paddingTop: 30,
    borderBottomWidth: 3,
    borderBottomColor: '#5ab4bd',
    display: 'flex',
    flexDirection: 'row',
    justifyContent: 'space-between',
    backgroundColor: '#fcf6d6',
  },
  tabStyle: {
    flex: 1,
    //marginRight: 1,
    //marginLeft: 1,
    height: 40,
    //borderTopLeftRadius: 16,
    //borderTopRightRadius: 16,
    backgroundColor: '#ffffff',
  },
  selectedTabStyle: {
    backgroundColor: '#5ab4bd',
  },
  textStyle: {
    fontWeight: 'bold',
    textAlign: 'center',
    paddingTop: 14,
  },
  selectedTextStyle: {
    color: '#ffffff',
  },
};

export default AppTabBar;
とりあえず、ここまでにしておく・・・
react-nativeでモーダル表示
react-nativeでモーダル表示
作成したもの
ソースコード
/**
 * Sample React Native App
 * https://github.com/facebook/react-native
 *
 * @format
 * @flow strict-local
 */

import React, {useState} from 'react';
import {
  SafeAreaView,
  StyleSheet,
  Button,
  View,
  Text,
  StatusBar,
  Modal,
  Alert,
  TouchableOpacity,
  Image,
  Dimensions,
} from 'react-native';

const height = Dimensions.get('window').height;
const width = Dimensions.get('window').width;

const App = () => {
  const [modalVisible, setModalVisible] = useState(false);

  console.log(height);
  console.log(width);

  return (
    <>
      <StatusBar barStyle="dark-content" />
      <SafeAreaView>
        <Button
          title="モーダルを開く"
          onPress={() => {
            setModalVisible(true);
          }}
        />
        <Modal
          animationType="slide"
          transparent={true}
          visible={modalVisible}
          //onRequestClose={() => {
          //  Alert.alert('Modal has been closed.');
          //}}
        >
          <TouchableOpacity
            activeOpacity={1}
            style={[styles.centeredView]}
            onPress={(event) => {
              console.log('おや');
              setModalVisible(false);
            }}></TouchableOpacity>
          <View style={[styles.modalView]}>
            <Text>sample</Text>
            <Image
              source={require('./assets/img/kaisya_woman_bad.png')}
              style={{
                width: width * 0.4,
                height: 200,
                //borderWidth: 1,
                borderColor: '#000000',
              }}
              resizeMode="contain"
            />
            <Button
              title="閉じる"
              onPress={() => {
                console.log('こ');
                setModalVisible(false);
              }}
            />
          </View>
        </Modal>
      </SafeAreaView>
    </>
  );
};

const styles = StyleSheet.create({
  centeredView: {
    flex: 1,
    justifyContent: 'center',
    alignItems: 'center',
    //marginTop: 22,
    backgroundColor: '#CCC',
    opacity: 0.7,
  },
  modalView: {
    position: 'absolute',
    alignSelf: 'center',
    top: height / 5,
    margin: 20,
    backgroundColor: 'white',
    borderRadius: 20,
    padding: 35,
    alignItems: 'center',
    shadowColor: '#000',
    shadowOffset: {
      width: 0,
      height: 2,
    },
    shadowOpacity: 0.25,
    shadowRadius: 3.84,
    elevation: 5,
  },
});

export default App;
使い方
モーダルコンポーネントを画面のどこかに配置とし、propのvisibleをfalseの状態にしておく
        <Modal
          animationType="slide"
          transparent={true}
          visible={modalVisible}
          //onRequestClose={() => {
          //  Alert.alert('Modal has been closed.');
          //}}
        >
          <TouchableOpacity
            activeOpacity={1}
            style={[styles.centeredView]}
            onPress={(event) => {
              console.log('おや');
              setModalVisible(false);
            }}></TouchableOpacity>
          <View style={[styles.modalView]}>
            <Text>sample</Text>
            <Image
              source={require('./assets/img/kaisya_woman_bad.png')}
              style={{
                width: width * 0.4,
                height: 200,
                //borderWidth: 1,
                borderColor: '#000000',
              }}
              resizeMode="contain"
            />
            <Button
              title="閉じる"
              onPress={() => {
                console.log('こ');
                setModalVisible(false);
              }}
            />
          </View>
        </Modal>
Buttonコンポーネントなどのタップイベントで展開開くようにする
        <Button
          title="モーダルを開く"
          onPress={() => {
            setModalVisible(true);
          }}
        />
まあ、ボタン出なくても条件を満たして値をtrueにすれば良い
react-nativeで画面上引っ張ってロードするあれ
作ったやつはこれ
スクロールができるコンポーネントを使わないといけないみたい
ScrollViewとかFlatList、VirtualizedListとかにrefreshControlがある場合は使用可能
あとはRefreshControlも必要
サンプルコード
/**
 * Sample React Native App
 * https://github.com/facebook/react-native
 *
 * @format
 * @flow strict-local
 */

import React, {useEffect, useState} from 'react';
import {
  SafeAreaView,
  StyleSheet,
  ScrollView,
  View,
  Text,
  StatusBar,
  FlatList,
  RefreshControl,
} from 'react-native';

const App = () => {
  const [refreshFlag, setRefreshFlag] = useState();
  const [list, setList] = useState();

  useEffect(() => {
    fetch();
  }, []);

  const fetch = () => {
    const num = Math.round(Math.random() * 100);

    const _list = [];
    for (let i = 0; i < num; i++) {
      _list.push({
        name: 'hoge' + String(i),
      });
    }
    setList(_list);
  };

  return (
    <View
      style={{
        flex: 1,
        paddingTop: Platform.select({
          ios: 50,
          android: 0,
        }),
      }}>
      <FlatList
        data={list}
        renderItem={({item}) => {
          return (
            <View style={[styles.row]}>
              <Text>{item.name}</Text>
            </View>
          );
        }}
        keyExtractor={(item, index) => index.toString()}
        refreshControl={
          <RefreshControl
            refreshing={refreshFlag}
            onRefresh={() => {
              console.log('aaaa');
              setRefreshFlag(true);
              setTimeout(() => {
                fetch();
                setRefreshFlag(false);
              }, 3000);
            }}
          />
        }
      />
    </View>
  );
};

const styles = StyleSheet.create({
  row: {
    height: 50,
    borderWidth: 1,
    borderColor: '#000000',
    marginBottom: 5,
  },
});

export default App;
補足
データをDBとか作って取り込むのは面倒だったので乱数生成
  const fetch = () => {
    const num = Math.round(Math.random() * 100);

    const _list = [];
    for (let i = 0; i < num; i++) {
      _list.push({
        name: 'hoge' + String(i),
      });
    }
    setList(_list);
  };
refreshControlで更新を呼び出す
        refreshControl={
          <RefreshControl
            refreshing={refreshFlag}
            onRefresh={() => {
              console.log('aaaa');
              setRefreshFlag(true);
              setTimeout(() => {
                fetch();
                setRefreshFlag(false);
              }, 3000);
            }}
          />
        }
RefreshControlを独自のコンポーネントで制御しようと思えばできるのかも・・・
react-nativeでgoogle mapを使用
react-nativeでgoogle mapを使用
環境
参考情報
【React Native】Googleマップを利用する(Android) - Ren's blog
React Nativeへ地図を表示する方法 - react-native-mapsライブラリを使ってReact Nativeへ地図を使う方法について調べてみます。
Get an API Key | Maps SDK for Android | Google Developers
google mapキーを取得
Google Cloud Platformへアクセスし、プロジェクトを新規に作成

認証情報画面へ遷移

認証情報を作成

APIキーを取得

確認

※有料です
手順
プロジェクトの新規作成
npx react-native init SampleMap1
cd SampleMap1
react-native-mapsコンポーネントを追加
npm install --save react-native-maps
npm install @react-native-community/geolocation --save
APIキーを設定
app配下のAndroidManifest.xmlを編集
<manifest xmlns:android="http://schemas.android.com/apk/res/android"
  package="com.samplemap1">

    <uses-permission android:name="android.permission.INTERNET" />

    <application
      android:name=".MainApplication"
      android:label="@string/app_name"
      android:icon="@mipmap/ic_launcher"
      android:roundIcon="@mipmap/ic_launcher_round"
      android:allowBackup="false"
      android:theme="@style/AppTheme">
      <activity
        android:name=".MainActivity"
        android:label="@string/app_name"
        android:configChanges="keyboard|keyboardHidden|orientation|screenSize|uiMode"
        android:launchMode="singleTask"
        android:windowSoftInputMode="adjustResize">
        <intent-filter>
            <action android:name="android.intent.action.MAIN" />
            <category android:name="android.intent.category.LAUNCHER" />
        </intent-filter>
      </activity>
      <activity android:name="com.facebook.react.devsupport.DevSettingsActivity" />

      <meta-data
        android:name="com.google.android.geo.API_KEY"
        android:value="もらったAPIキー" />

    </application>

</manifest>
App.jsを改修
/**
 * Sample React Native App
 * https://github.com/facebook/react-native
 *
 * @format
 * @flow strict-local
 */

import React from 'react';
import {
  Platform,
  StyleSheet,
  Button,
  Text,
  View,
  Dimensions,
} from 'react-native';
import MapView, { PROVIDER_GOOGLE, Region, Marker } from 'react-native-maps';
//import Geolocation, { GeolocationResponse } from '@react-native-community/geolocation';

const { width, height } = Dimensions.get('window');
const ASPECT_RATIO = width / height;
const LATITUDE_DELTA = 0.0922/4;
const LONGITUDE_DELTA = LATITUDE_DELTA * ASPECT_RATIO;
const places = {
  disneyland: {
    label: 'Disneyland',
    region: {
      latitude: 33.8120918,
      longitude: -117.9189742,
      latitudeDelta: LATITUDE_DELTA,
      longitudeDelta: LONGITUDE_DELTA,
    },
    marker: {
      latlng: {
        latitude: 33.8120918,
        longitude: -117.9189742,
      },
      title: 'Disneyland',
      description: 'Theme park',
    },
  },
  universalstudio: {
    label: 'Universal Studio Hollywood',
    region: {
      latitude: 34.1381168,
      longitude: -118.3533783,
      latitudeDelta: LATITUDE_DELTA,
      longitudeDelta: LONGITUDE_DELTA,
    },
    marker: {
      latlng: {
        latitude: 34.1381168,
        longitude: -118.3533783,
      },
      title: 'Universal Studio Hollywood',
      description: 'Film studio and theme park',
    },
  }
}

export default class App extends React.Component {

  inPlace2 = false;
  placeName = '';
  marker1;

  constructor(props){
    super(props);
    this.placeName = places.universalstudio.label;
    this.state = {
      region: places.universalstudio.region,
      marker: places.universalstudio.marker,
    };
  }

  movePlace(){
    this.marker1.hideCallout();
    if(this.inPlace2){
      this.placeName = places.universalstudio.label;
      this.setState({
        region: places.universalstudio.region,
        marker: places.universalstudio.marker,
      });
    }
    else{
      this.placeName = places.disneyland.label;
      this.setState({
        region: places.disneyland.region,
        marker: places.disneyland.marker,
      });
    }
    this.inPlace2 = !this.inPlace2;
  }

  render() {
    return (
      <View style={{flex:1}}>
        <MapView
          style={{flex:1}}
          region={this.state.region}
          provider={PROVIDER_GOOGLE} >
          <MapView.Marker
            ref={(ref)=>{this.marker1 = ref;}}
            coordinate={this.state.marker.latlng}
            title={this.state.marker.title}
            description={this.state.marker.description}
          />
        </MapView>
        <View style={{height:100,padding:16}}>
          <Text>{this.placeName}</Text>
          <Button title="Move" onPress={()=>this.movePlace()}/>
        </View>
      </View>
    );
  }
}
起動
npx react-native run-android
↓

気をつけること
- MAP APIが有効でないと動かない
react-nativeをexpoで作成
react-nativeをexpoで作成
概要
m-shige1979.hatenablog.com でCLIを使用した環境設定はできた感じとしてexpoの場合はどんな感じなのか確認する。
expo.io
アカウント作成

アカウント作成後の画面

ツールインストール
android studioやxcodeをインストール
xcodeがapple storeより android studioはDownload Android Studio and SDK tools | Android Developersよりインストール ※一応いるのね・・・expo側でなんかいい感じにしてくれると思ってましたよ( ;∀;)
anyenvインストール
anyenv install --init
mkdir -p $(anyenv root)/plugin
git clone https://github.com/znz/anyenv-update.git $(anyenv root)/plugins/anyenv-update
anyenv update
anyenv install nodenv
exec $SHELL -l
nodenvインストール
nodenv install 14.11.0
nodenv global 14.11.0
node --version
npmよりexpoインストール
npm install expo-cli --global
アプリ作成
プロジェクト作成
npx expo init myapp1
※私の環境はzshなのでパスがうまく通らないのでnpx経由で起動
起動
cd myapp1
yarn start
↓

↓
iosを選択

※eset入れていたら19000〜19002あたり開けること
ソース改修
App.js
import { StatusBar } from 'expo-status-bar';
import React from 'react';
import { StyleSheet, Text, View } from 'react-native';

export default function App() {
  return (
    <View style={styles.container}>
      <Text>hello world</Text>
      <StatusBar style="auto" />
    </View>
  );
}

const styles = StyleSheet.create({
  container: {
    flex: 1,
    backgroundColor: '#fff',
    alignItems: 'center',
    justifyContent: 'center',
  },
});
↓

基本的にソースを修正後に自動的に変更が反映される仕組みだが、 ポートを閉じていたりいたらうまく動作しないため、最初のうちはシミュレータを再度起動し直す必要があるかも
実機に入れるのは今後にする スマホアプリのexpo clientとかでどうにかするらしいが・・・
終わり
herokuでCORSを確認
herokuでCORSを確認
CORS
要はajaxとかでホストの異なるリクエストを取得できないこと
環境
大元(リクエスト先)
mighty-taiga-69931.herokuapp.com
index.php
<?php
session_start();
if ($_SESSION["auth"] === true) {
    // redirect
    header('Location: ./top.php');
    exit;
}
?>
<!DOCTYpe html>
<html>
<head>
    <script type="text/javascript" src="./jquery-3.5.1.min.js"></script>
</head>
<body>
    <div>
    <label>
            userid: <input type="text" class="id" ame="userid" />
        </label>
        <label>
            password: <input type="password" class="pw" name="password" />
        </label>
        <button type="button" class="login-btn">
            login
        </button>
    </div>
<script>
$(function() {
    $(".login-btn").on("click", function() {
        console.log("login");

        let params = {
            "userid": $(".id").val(),
            "password": $(".pw").val()
        };

        $.ajax({
            type: "POST",
            url: "./login.php",
            contentType: 'application/json',
            dataType: "json",
            data: JSON.stringify(params),
            success: function(msg){
                console.log(msg);
                location.href = "/";
            },
            error: function(msg){
                console.log(msg);
            }
        });
    });
});
</script>
</body>
</html>
login.php
<?php
session_start();

$json = file_get_contents("php://input");
$contents = json_decode($json, true);
//var_dump($contents);

$new_sessionid = session_id();
$auth = "NG";
if ($contents["userid"] == "admin"  && $contents["password"] == "pass") {
    $auth = "OK";

    //
    session_regenerate_id(true);
    $new_sessionid = session_id();
    $_SESSION["auth"] = true;
}

$result = [
    "status" => 200,
    "auth" => $auth,
    "session_id" => $new_sessionid,
];

echo json_encode($result);
?>
logout.php
<?php
session_start();

$_SESSION = array();

if (ini_get("session.use_cookies")) {
    $params = session_get_cookie_params();
    setcookie(session_name(), '', time() - 42000,
        $params["path"], $params["domain"],
        $params["secure"], $params["httponly"]
    );
}

session_destroy();
session_regenerate_id(true);
?>
検証用(大元へアクセスする方)
pacific-harbor-45480.herokuapp.com
index.php
<!DOCTYpe html>
<html>
<head>
    <script type="text/javascript" src="./jquery-3.5.1.min.js"></script>
</head>
<body>
    <div>
    <label>
            userid: <input type="text" class="id" ame="userid" />
        </label>
        <label>
            password: <input type="password" class="pw" name="password" />
        </label>
        <button type="button" class="login-btn">
            login
        </button>
    </div>
<script>
$(function() {
    $(".login-btn").on("click", function() {
        console.log("login");

        let params = {
            "userid": $(".id").val(),
            "password": $(".pw").val()
        };

        $.ajax({
            type: "POST",
            url: "https://mighty-taiga-69931.herokuapp.com//login.php",
            contentType: 'application/json',
            dataType: "json",
            data: JSON.stringify(params),
            success: function(msg){
                console.log(msg);
                location.href = "/";
            },
            error: function(msg){
                console.log(msg);
            }
        });
    });
});
</script>
</body>
</html>
確認
        $.ajax({
            type: "POST",
            url: "https://mighty-taiga-69931.herokuapp.com//login.php",
            contentType: 'application/json',
            dataType: "json",
            data: JSON.stringify(params),
            success: function(msg){
                console.log(msg);
                location.href = "/";
            },
            error: function(msg){
                console.log(msg);
            }
        });
結果
Access to XMLHttpRequest at 'https://mighty-taiga-69931.herokuapp.com//login.php' from origin 'https://pacific-harbor-45480.herokuapp.com' has been blocked by CORS policy: Response to preflight request doesn't pass access control check: No 'Access-Control-Allow-Origin' header is present on the requested resource.

うん、出ました。 対策としては「Access-Control-Allow-Headers」を大元より返却するようにする。
app側でやるかnginxとかのwebサーバのどちらかで対応できるかも
header("Access-Control-Allow-Origin: *");
header("Access-Control-Allow-Methods: GET,POST,HEAD,OPTIONS");
header("Access-Control-Allow-Headers: Content-Type");
e
もし、ホストを任意のもの限定にしたい場合は
header("Access-Control-Allow-Origin: https://pacific-harbor-45480.herokuapp.com");
みたいにすることで対応可能
終わり